

Importing your order list
Most of what you have on order is already written down somewhere: an order tracker in Excel, a CSV your ordering software exports, a PDF the vendor sent back. Instead of typing each piece into the portal one at a time, upload that file and we build your expected arrivals from it.
Nothing is created until you have looked over every line, so it is safe to upload a file just to see what we find in it.
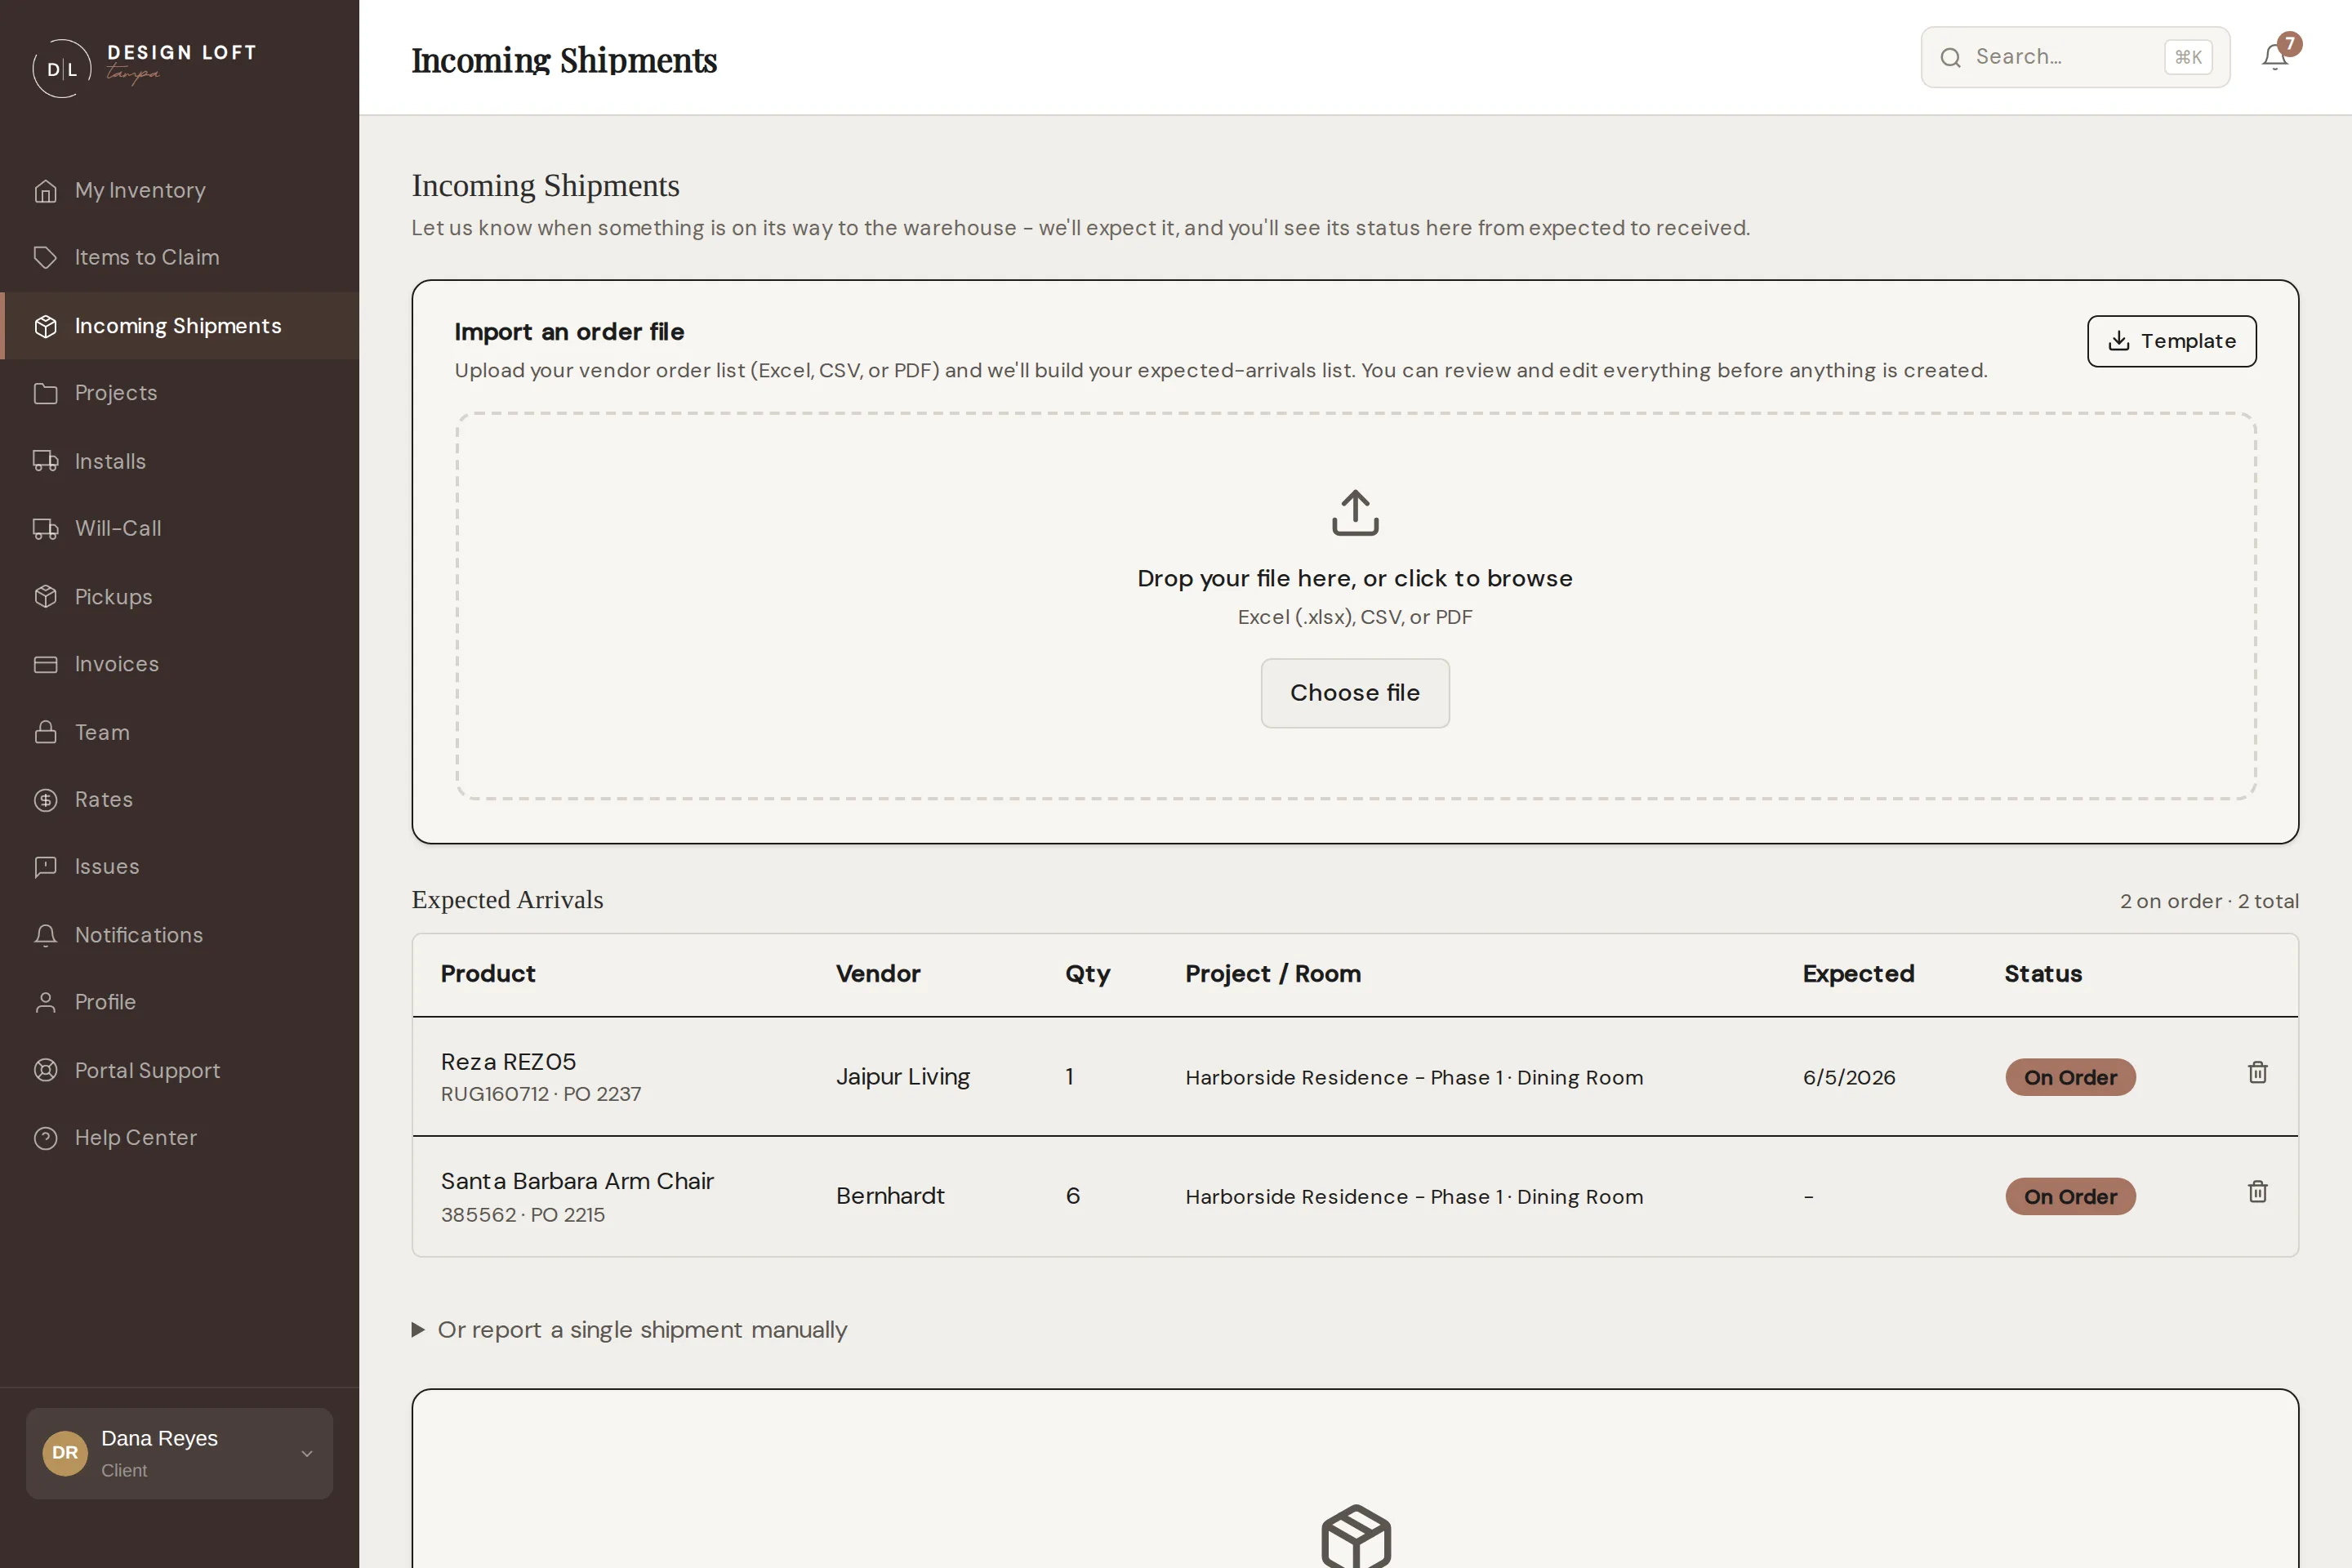
Importing a file
Section titled “Importing a file”- Open Incoming Shipments in the sidebar.
- In the Import an order file box, drag your file in, or click Choose file and pick it.
- Wait while we read it. Excel and CSV files come back straight away. A PDF takes longer because we read it page by page, and the box tells you which page we are on.
- Look over the items we found and fix anything that came across wrong - see Checking the list before you import.
- Choose the Project these items belong to. Pick one of your existing projects, or type a new project name.
- Click the Import button underneath the table. It tells you how many items you are about to add.
You get a confirmation with how many items were added, and they appear under Expected Arrivals on the same page right away. Blank rows in your file are skipped and the confirmation says how many.
Want to load a second file - a different vendor, a different project? Click Import another file and repeat. One project per file.
What kind of file works
Section titled “What kind of file works”- Excel (.xlsx) or CSV - your own order tracker, or an export from your ordering software. Up to 8 MB.
- PDF - a vendor order confirmation, a purchase order, or a warehouse manifest. We read the pages and pull the line items out of them.
We look for the usual columns: your spec code, vendor, product name, SKU, quantity, room, PO or order number, expected ship date, a link to the piece on the vendor’s website, tracking number, and notes. Your file does not have to have all of them, and the column headings do not have to match ours - we work out which column is which, and you can correct us.
If you would rather start from a clean sheet, click Template in the top-right of the import box. That downloads an Excel sheet with our columns already set up, including a Vendor Link column: fill it in and upload it.
Checking the list before you import
Section titled “Checking the list before you import”Everything we found lands in an editable table first. Nothing is added to your account until you click the Import button underneath it.
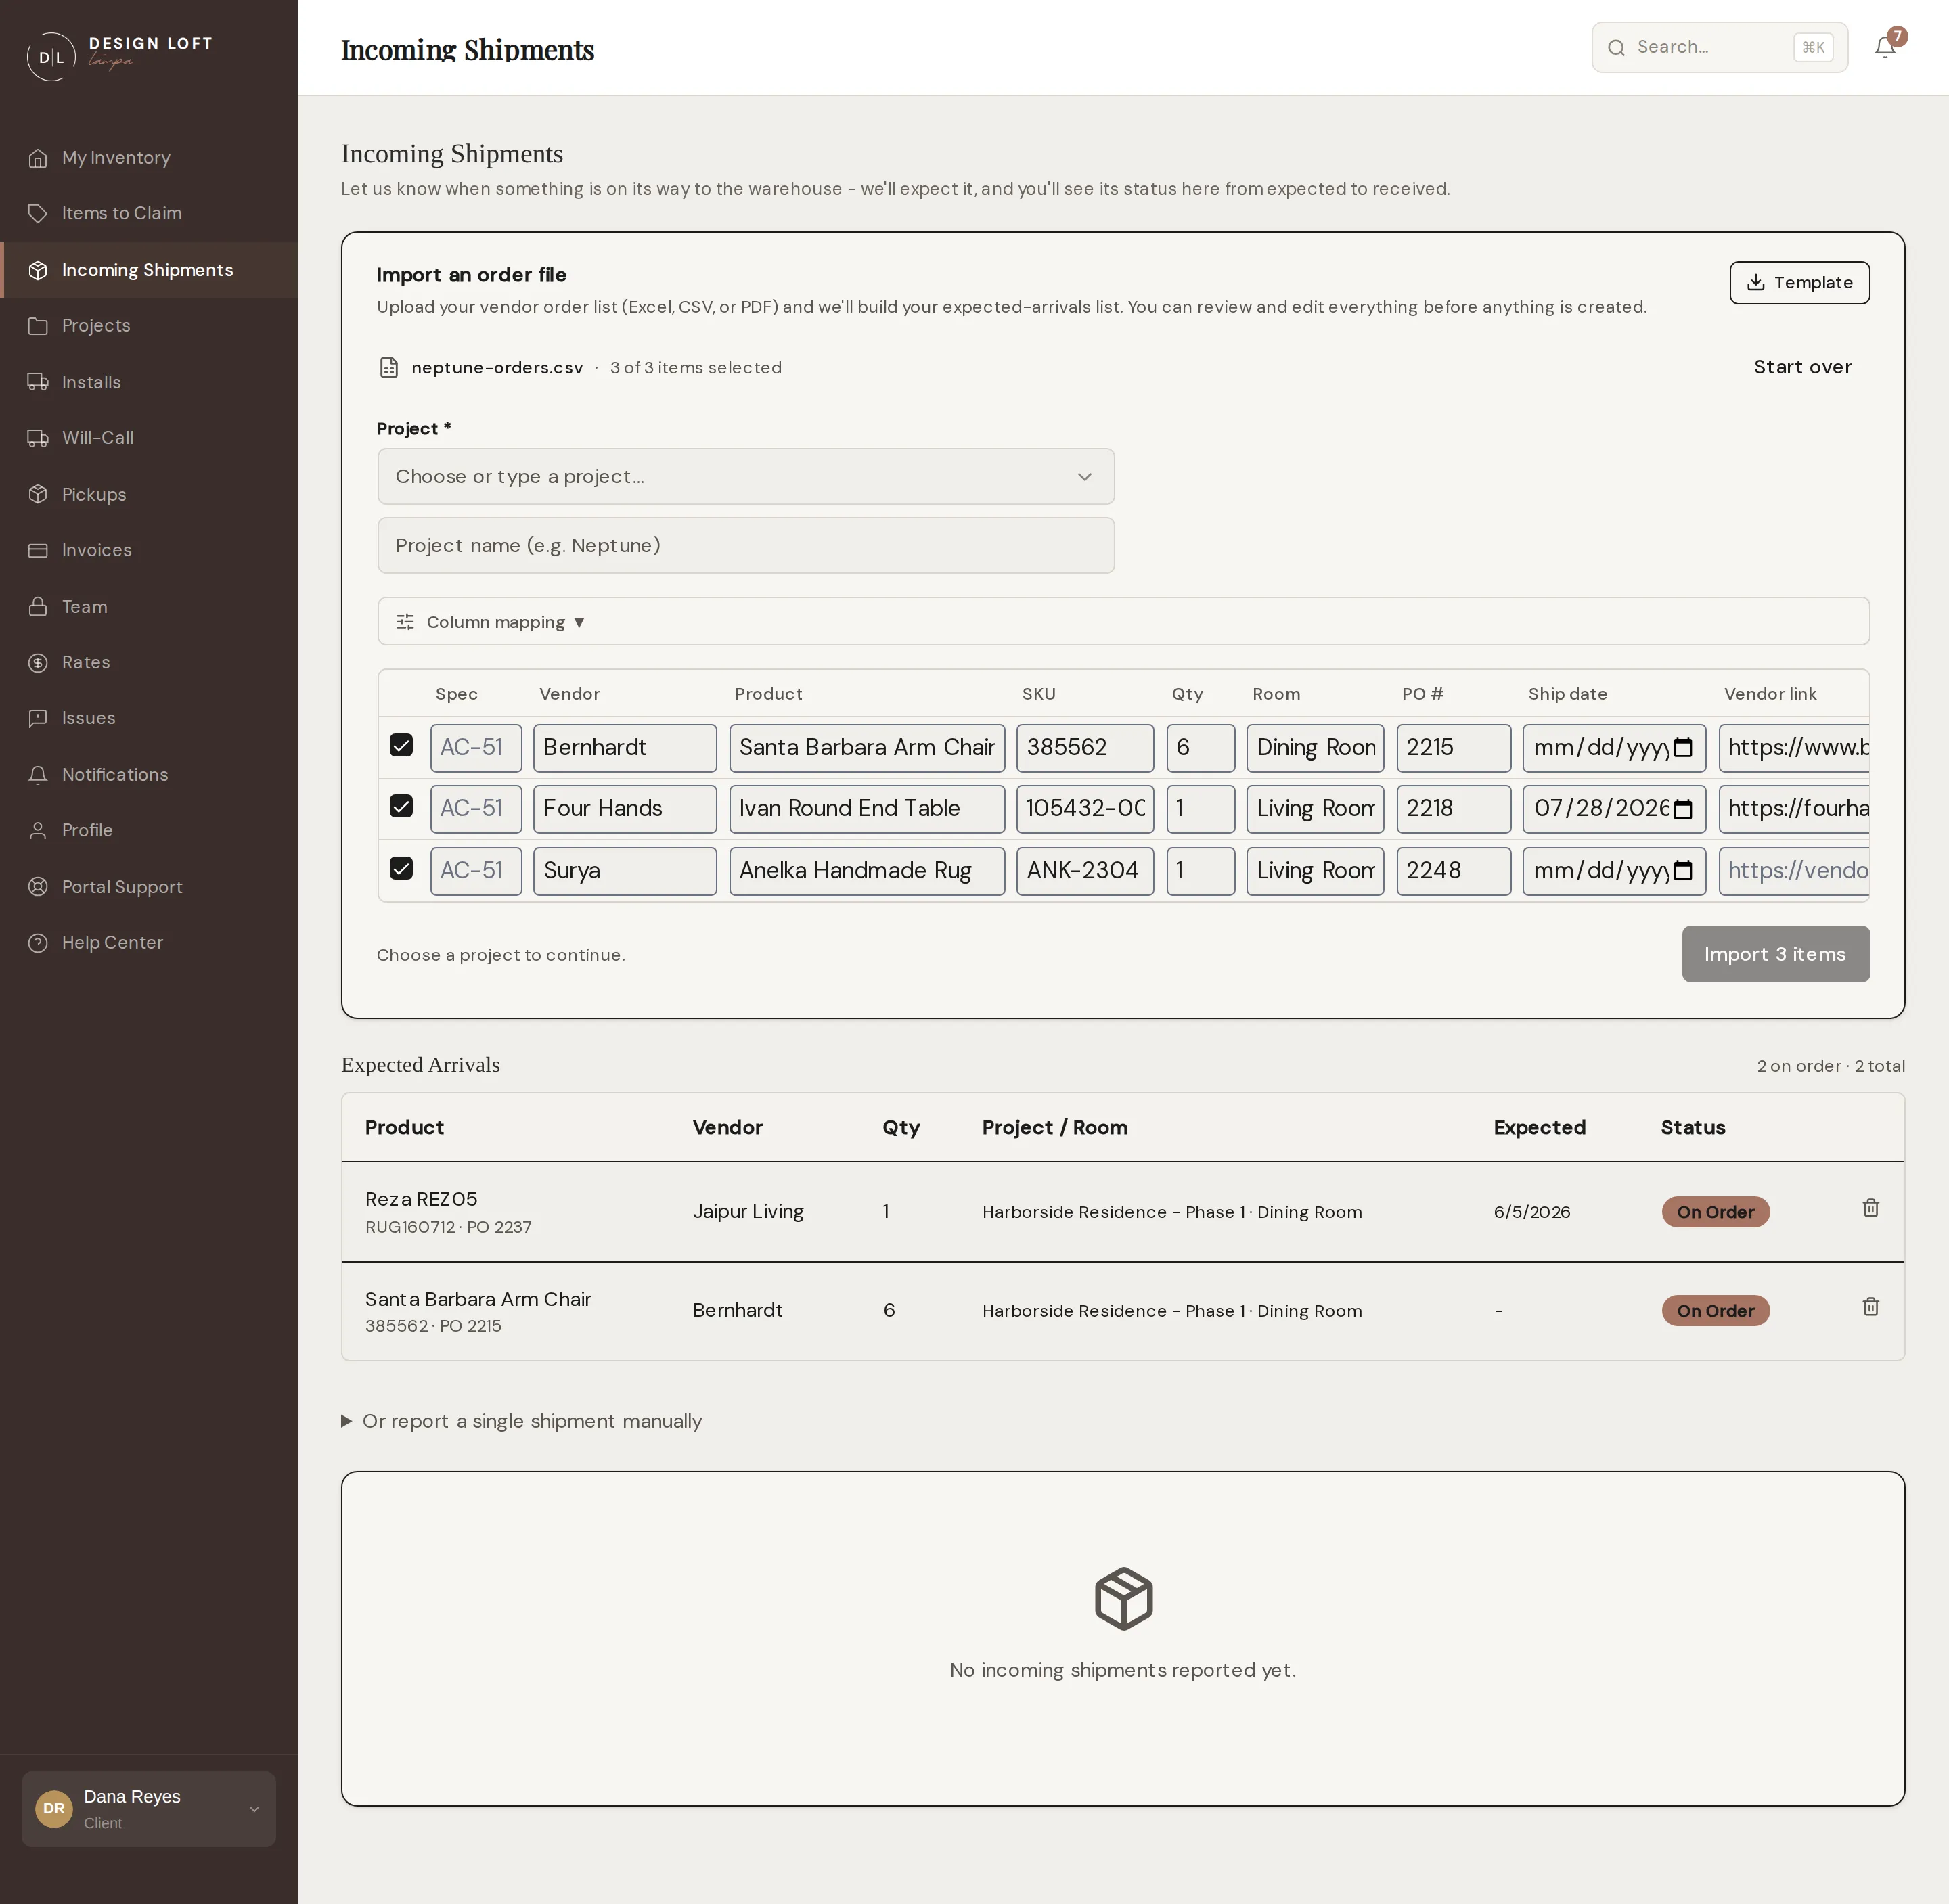
- Fix anything that came across wrong. Spec code, vendor, product, SKU, quantity, room, PO number, expected ship date, and the vendor link can all be typed over right in the table.
- Leave a line out by clearing the checkbox at the start of the row, or remove it entirely with the trash icon at the end of the row.
- An amber note under a product is us flagging something we were not sure about, usually a missing product name or a quantity we could not read. Worth a look before you import.
- Whole columns in the wrong place? Open Column mapping and tell us what each column of your file really is. The table below updates as you change it. This is for spreadsheets - PDFs do not need it.
- Wrong file? Click Start over and upload a different one.
The link to the vendor’s page
Section titled “The link to the vendor’s page”Most order lists already point at the piece on the vendor’s website somewhere, and that link is worth keeping. We save it with the line, and when the box lands it follows the piece into your inventory - so we can pull the vendor’s own description, dimensions, and photos for it instead of hunting down the page. The review table has a Vendor link column showing what we found for each line - scroll the table sideways if it sits off the edge of your screen.
You do not have to lay your file out any particular way for this to work. We pick the link up from:
- A column of links. Call it Vendor Link, Product Link, Product Page, or anything close and we will spot it. It is in the downloadable template as well.
- A link sitting in your notes. If the web address is pasted into a notes cell rather than a column of its own, we pull it out of there.
- A product name that is clickable in Excel. If the link is attached to the product name instead of typed out, we still find it.
- A PDF with the address printed on the page. We read it off the page along with the rest of the line.
The link is optional. Type over one that came across wrong, paste one in for a line we missed, or clear it - a line with no link imports perfectly well, and you can always send us the page later when you report an issue or ask us something.
Your spec codes
Section titled “Your spec codes”If you give each piece your own code, like the AC-51 on your tracking sheet, keep it in your file. We read it from a column called Spec Code, Spec #, Spec, or Tag, and it shows as the first column in the review table.
When the piece arrives, our team picks it off your list as they check it in, and your spec code comes with it. From then on you will see it:
- before the product name under Expected Arrivals, while the piece is still on order
- next to the item in your inventory, on the item’s own page as Your Spec Code, and on the page of the box it came in
- on the label we put on the box, so the piece is easy to find on the shelf
- in your inventory download
You can search your inventory by spec code too. A spec code is optional. Lines without one import and arrive exactly as before.
Your expected arrivals
Section titled “Your expected arrivals”Everything you import shows under Expected Arrivals on the Incoming Shipments page, sorted by project and room, with a count at the top of how many are still on order.
| Status | What it means |
|---|---|
| On Order | Placed with the vendor and not here yet. |
| Arrived | The freight has landed at our dock. |
| Received | Checked in, inspected, photographed, and now in your inventory. |
As freight arrives we check the boxes off against this list, so at any point you can see what a project is still waiting on.
Removing something you are no longer expecting
Section titled “Removing something you are no longer expecting”The vendor cancelled the order, or a line came across wrong in the file. You can take it off the list yourself - no need to ask us.
- Open Incoming Shipments in the sidebar.
- Find the line under Expected Arrivals.
- Click the trash icon at the end of the row.
- Check the name in the confirmation and click Remove.
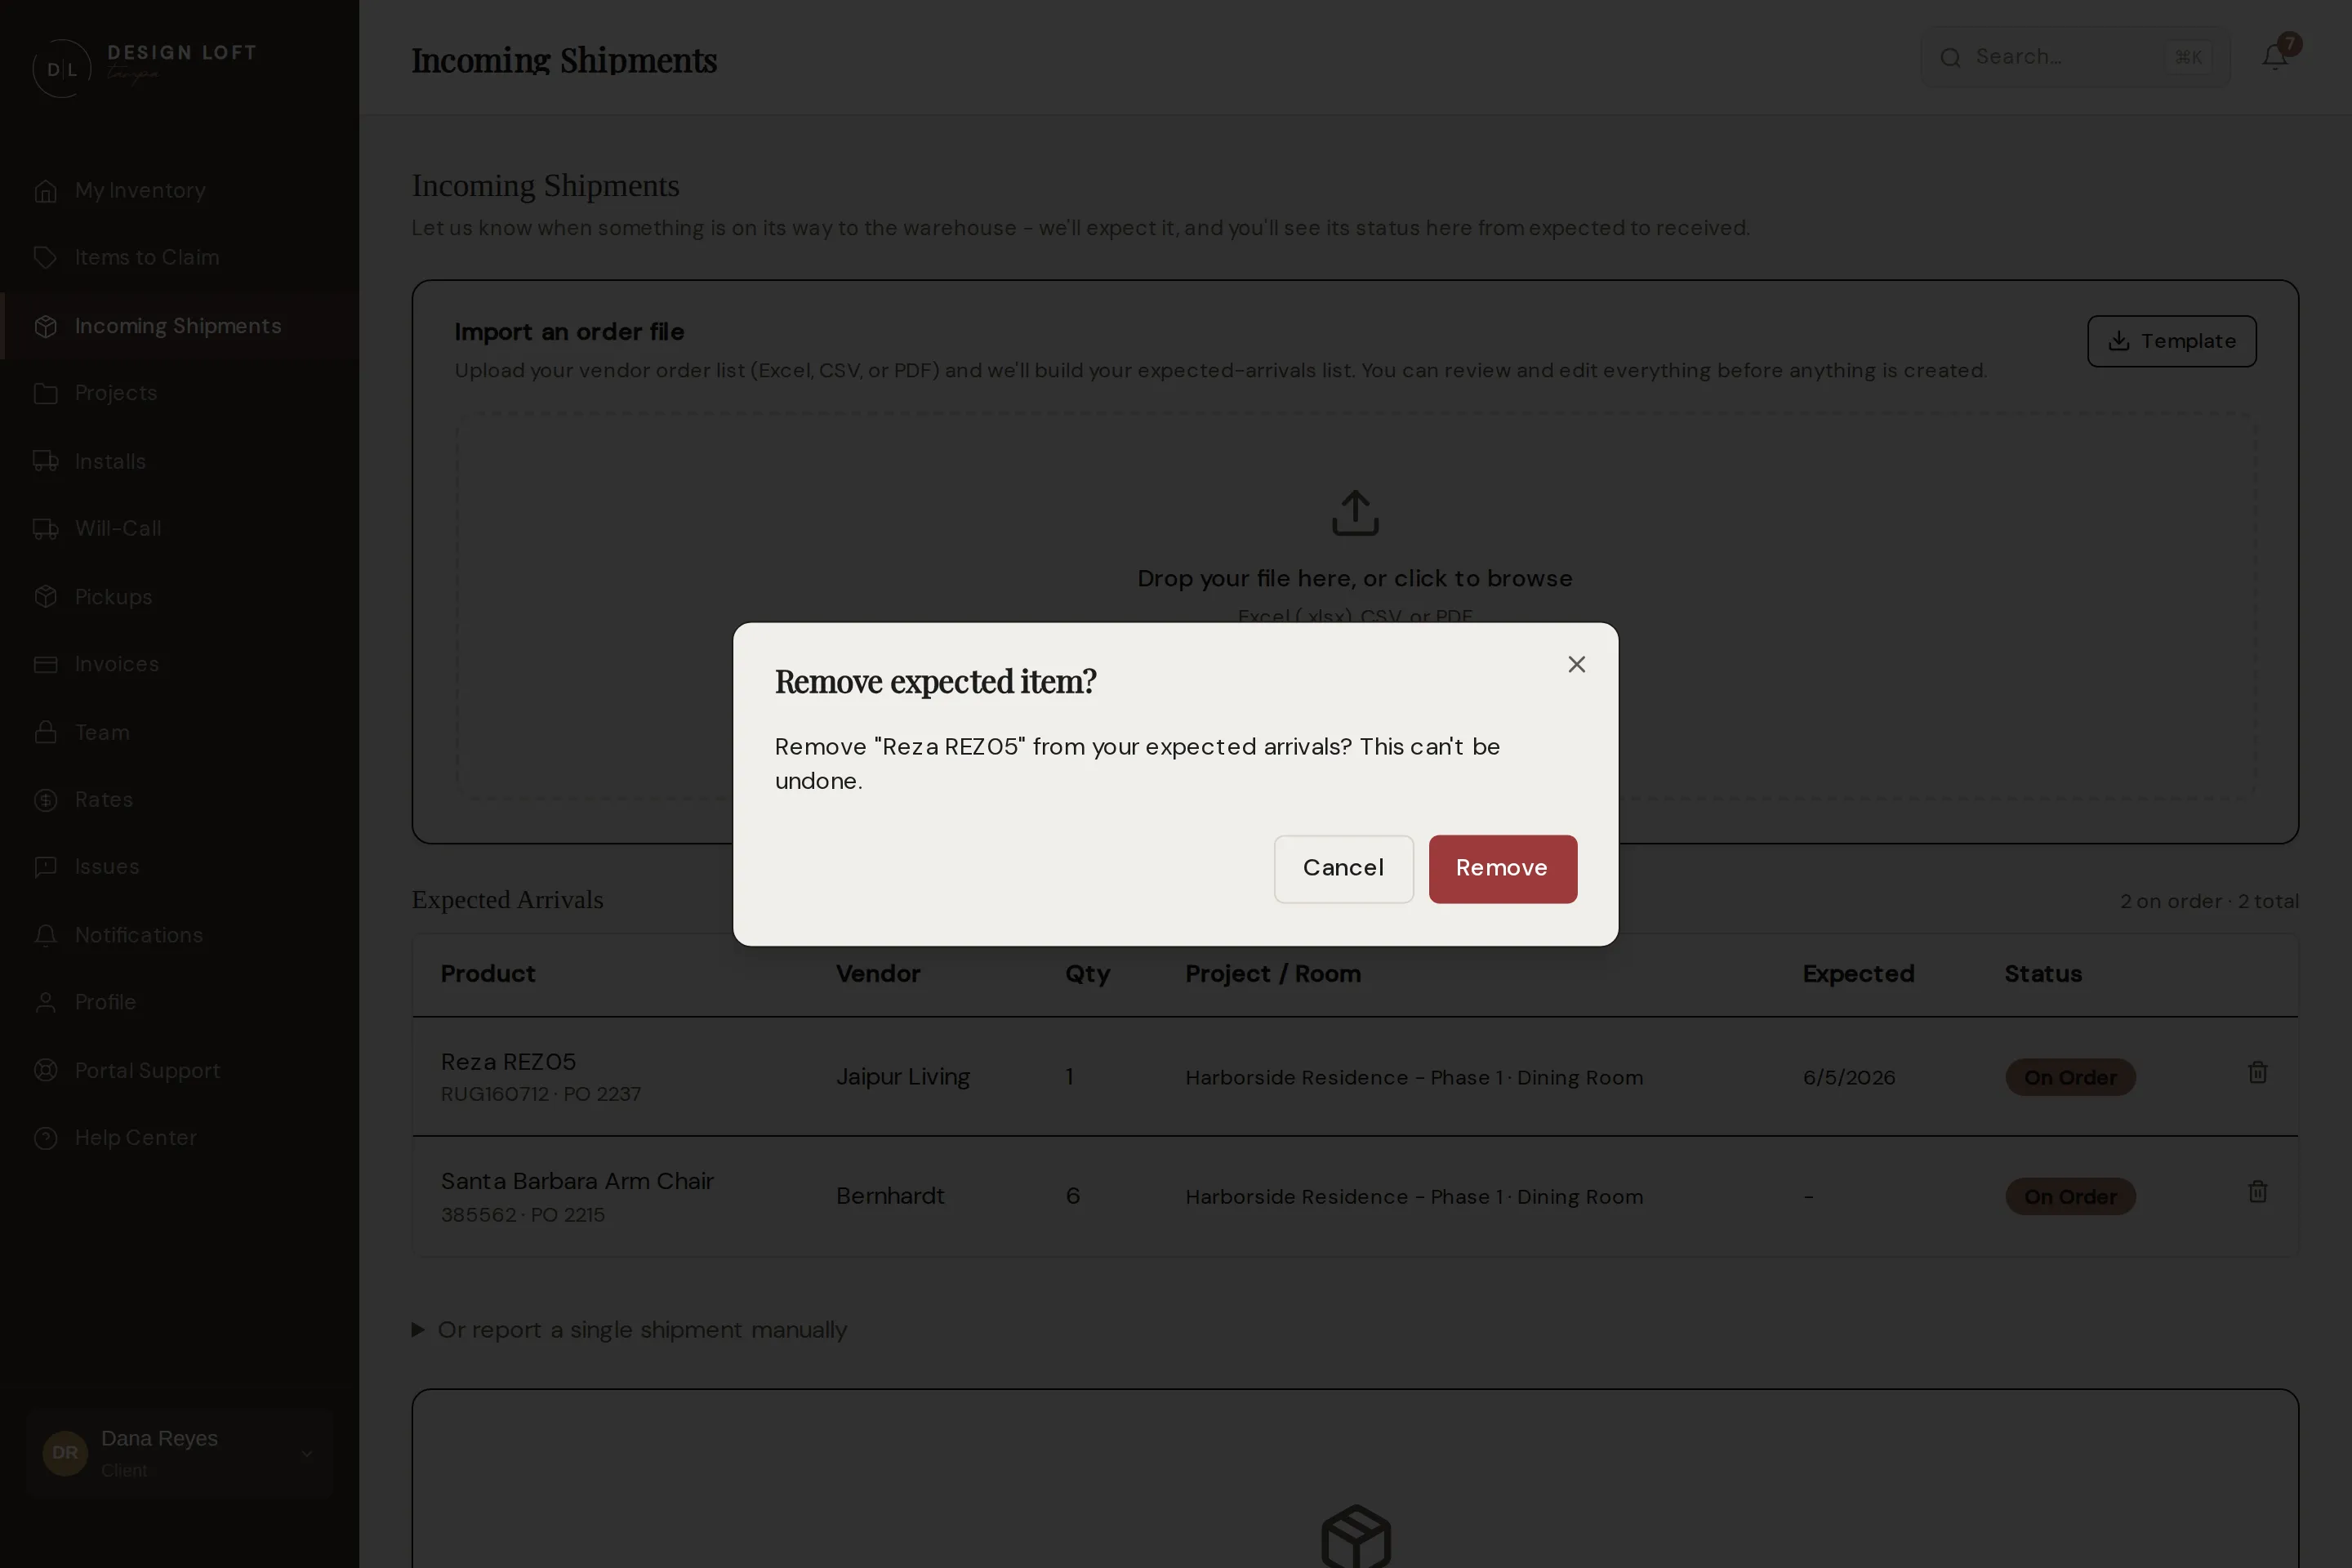
The line disappears straight away and we stop watching for it. There is no undo - if the order is still live and you only needed to correct a detail, import or report the piece again so we know to expect it.
Once a piece has actually been Received it is real inventory, not an expectation, so the trash icon goes away. If something was received in error, open an issue or tell us and we will sort it out.
A few things worth knowing
Section titled “A few things worth knowing”- Importing is not the same as labeling. We still match physical boxes to you by sidemark. An imported list tells us what to expect; the sidemark on the box is what gets it to your shelf.
- An expected arrival is not inventory yet. It only becomes an item in your inventory once the real thing arrives and we check it in.
- One shipment, already moving? If you only want to flag a single shipment with its carrier and tracking number, use the manual form instead - see Telling us what’s on the way.