

Item details and photos
Select View on any inventory row (or search for the item with ⌘K) to open its detail page.
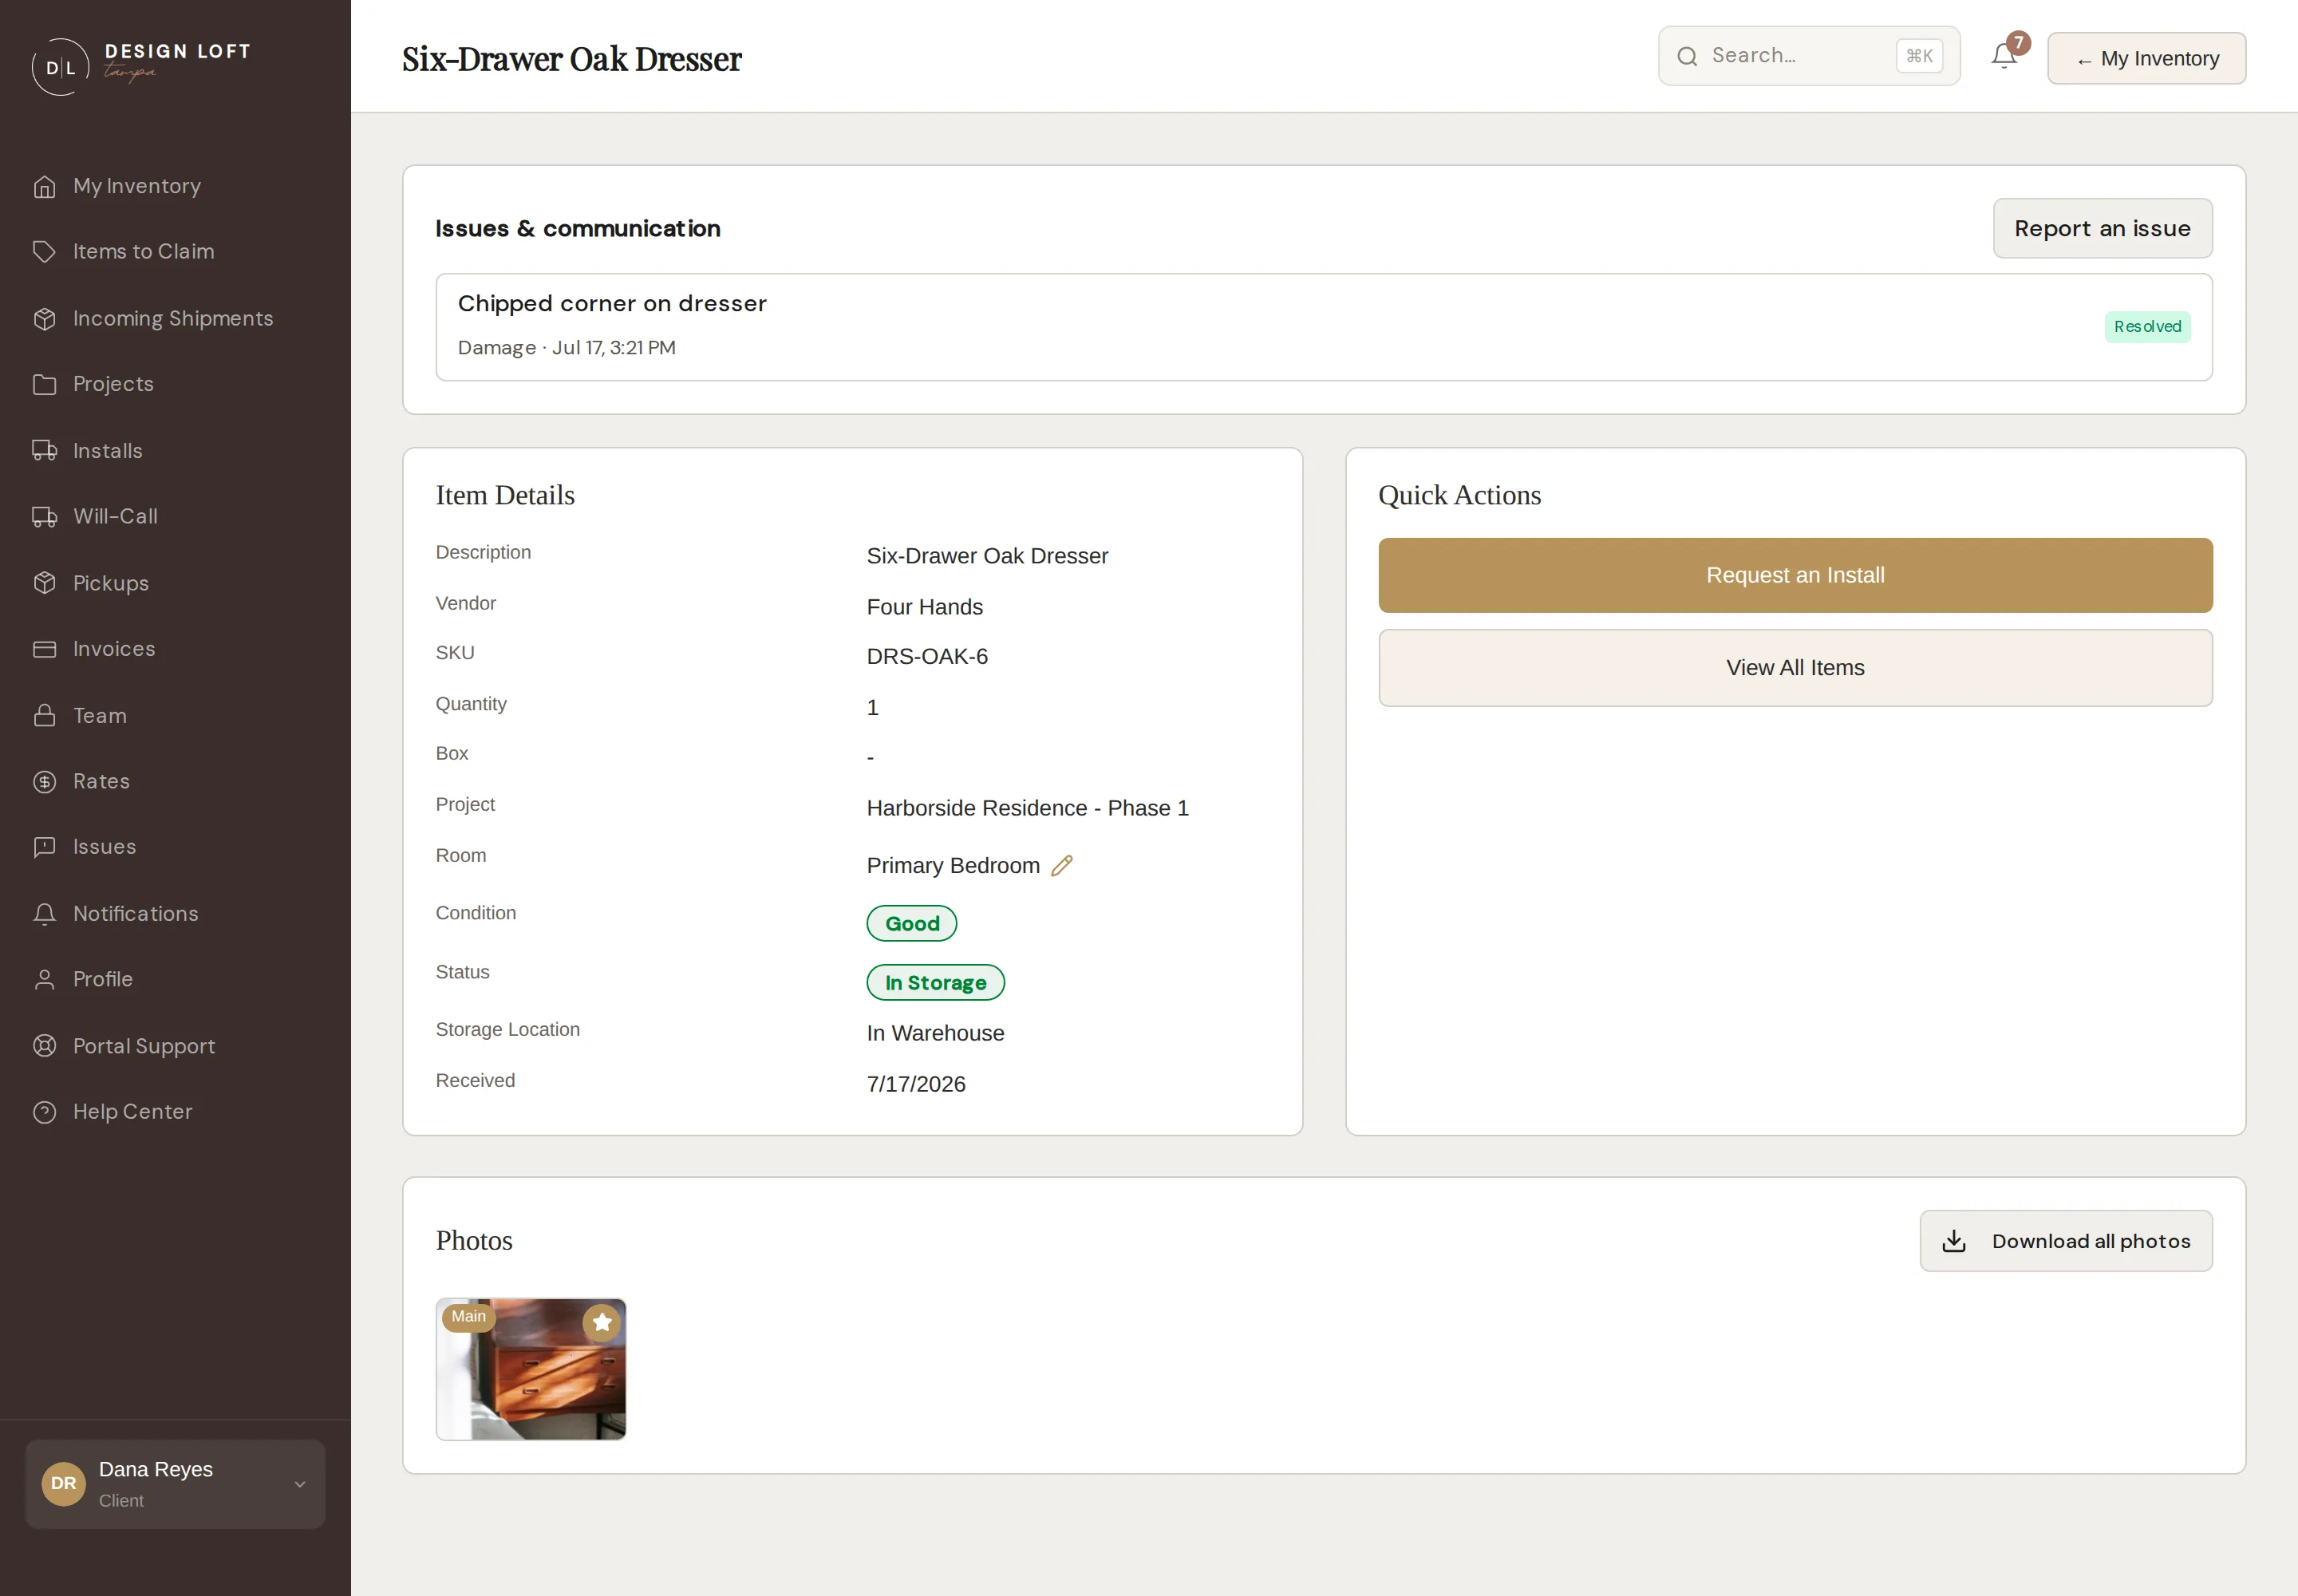
What you will find
Section titled “What you will find”- Photos. Inspection photos taken when the item was received and unboxed, plus any box and shipment photos. This is your visual record of the condition it arrived in, and Download all photos saves every one of them at once - see Downloading every photo of a piece. Occasionally a picture here came from the vendor’s website instead - those are labeled Stock photo, and Pictures that came from the vendor explains what that changes. Rugs show the wrapped roll, because we shelve them sealed unless you ask us to open one - see Rugs are shelved sealed.
- The facts. Status, condition, vendor, SKU, quantity, storage location, and the date received. If the piece carries your own spec code, such as AC-51, it shows here as Your Spec Code - see Your spec codes.
- Room. The room the piece is headed for in the finished home. This one is yours to set and change - see Setting the room a piece goes in.
- Project. Which project the item is assigned to. If it came in without one, an Assign a project link appears - see Managing your projects.
- Box. If the item arrived in a labeled box, its label ID links to that box’s own page - see below.
- Box size. How big and how heavy that box is, once we have measured it - see How big the box is.
- Issues. Every issue ever opened about this item, with a Report an issue button to start a new one. See Reporting an issue.
Setting the room a piece goes in
Section titled “Setting the room a piece goes in”Where a piece belongs is your call, not ours - so Room on the item page is yours to fill in, and to change whenever the plan changes.
- Open the item’s page.
- Next to Room, click the pencil.
- Type the room, for example “Living Room”, “Primary Bath”, or “Unit 402”.
- Click the check mark to save, or press Enter. To back out without saving, click the X or press Esc.
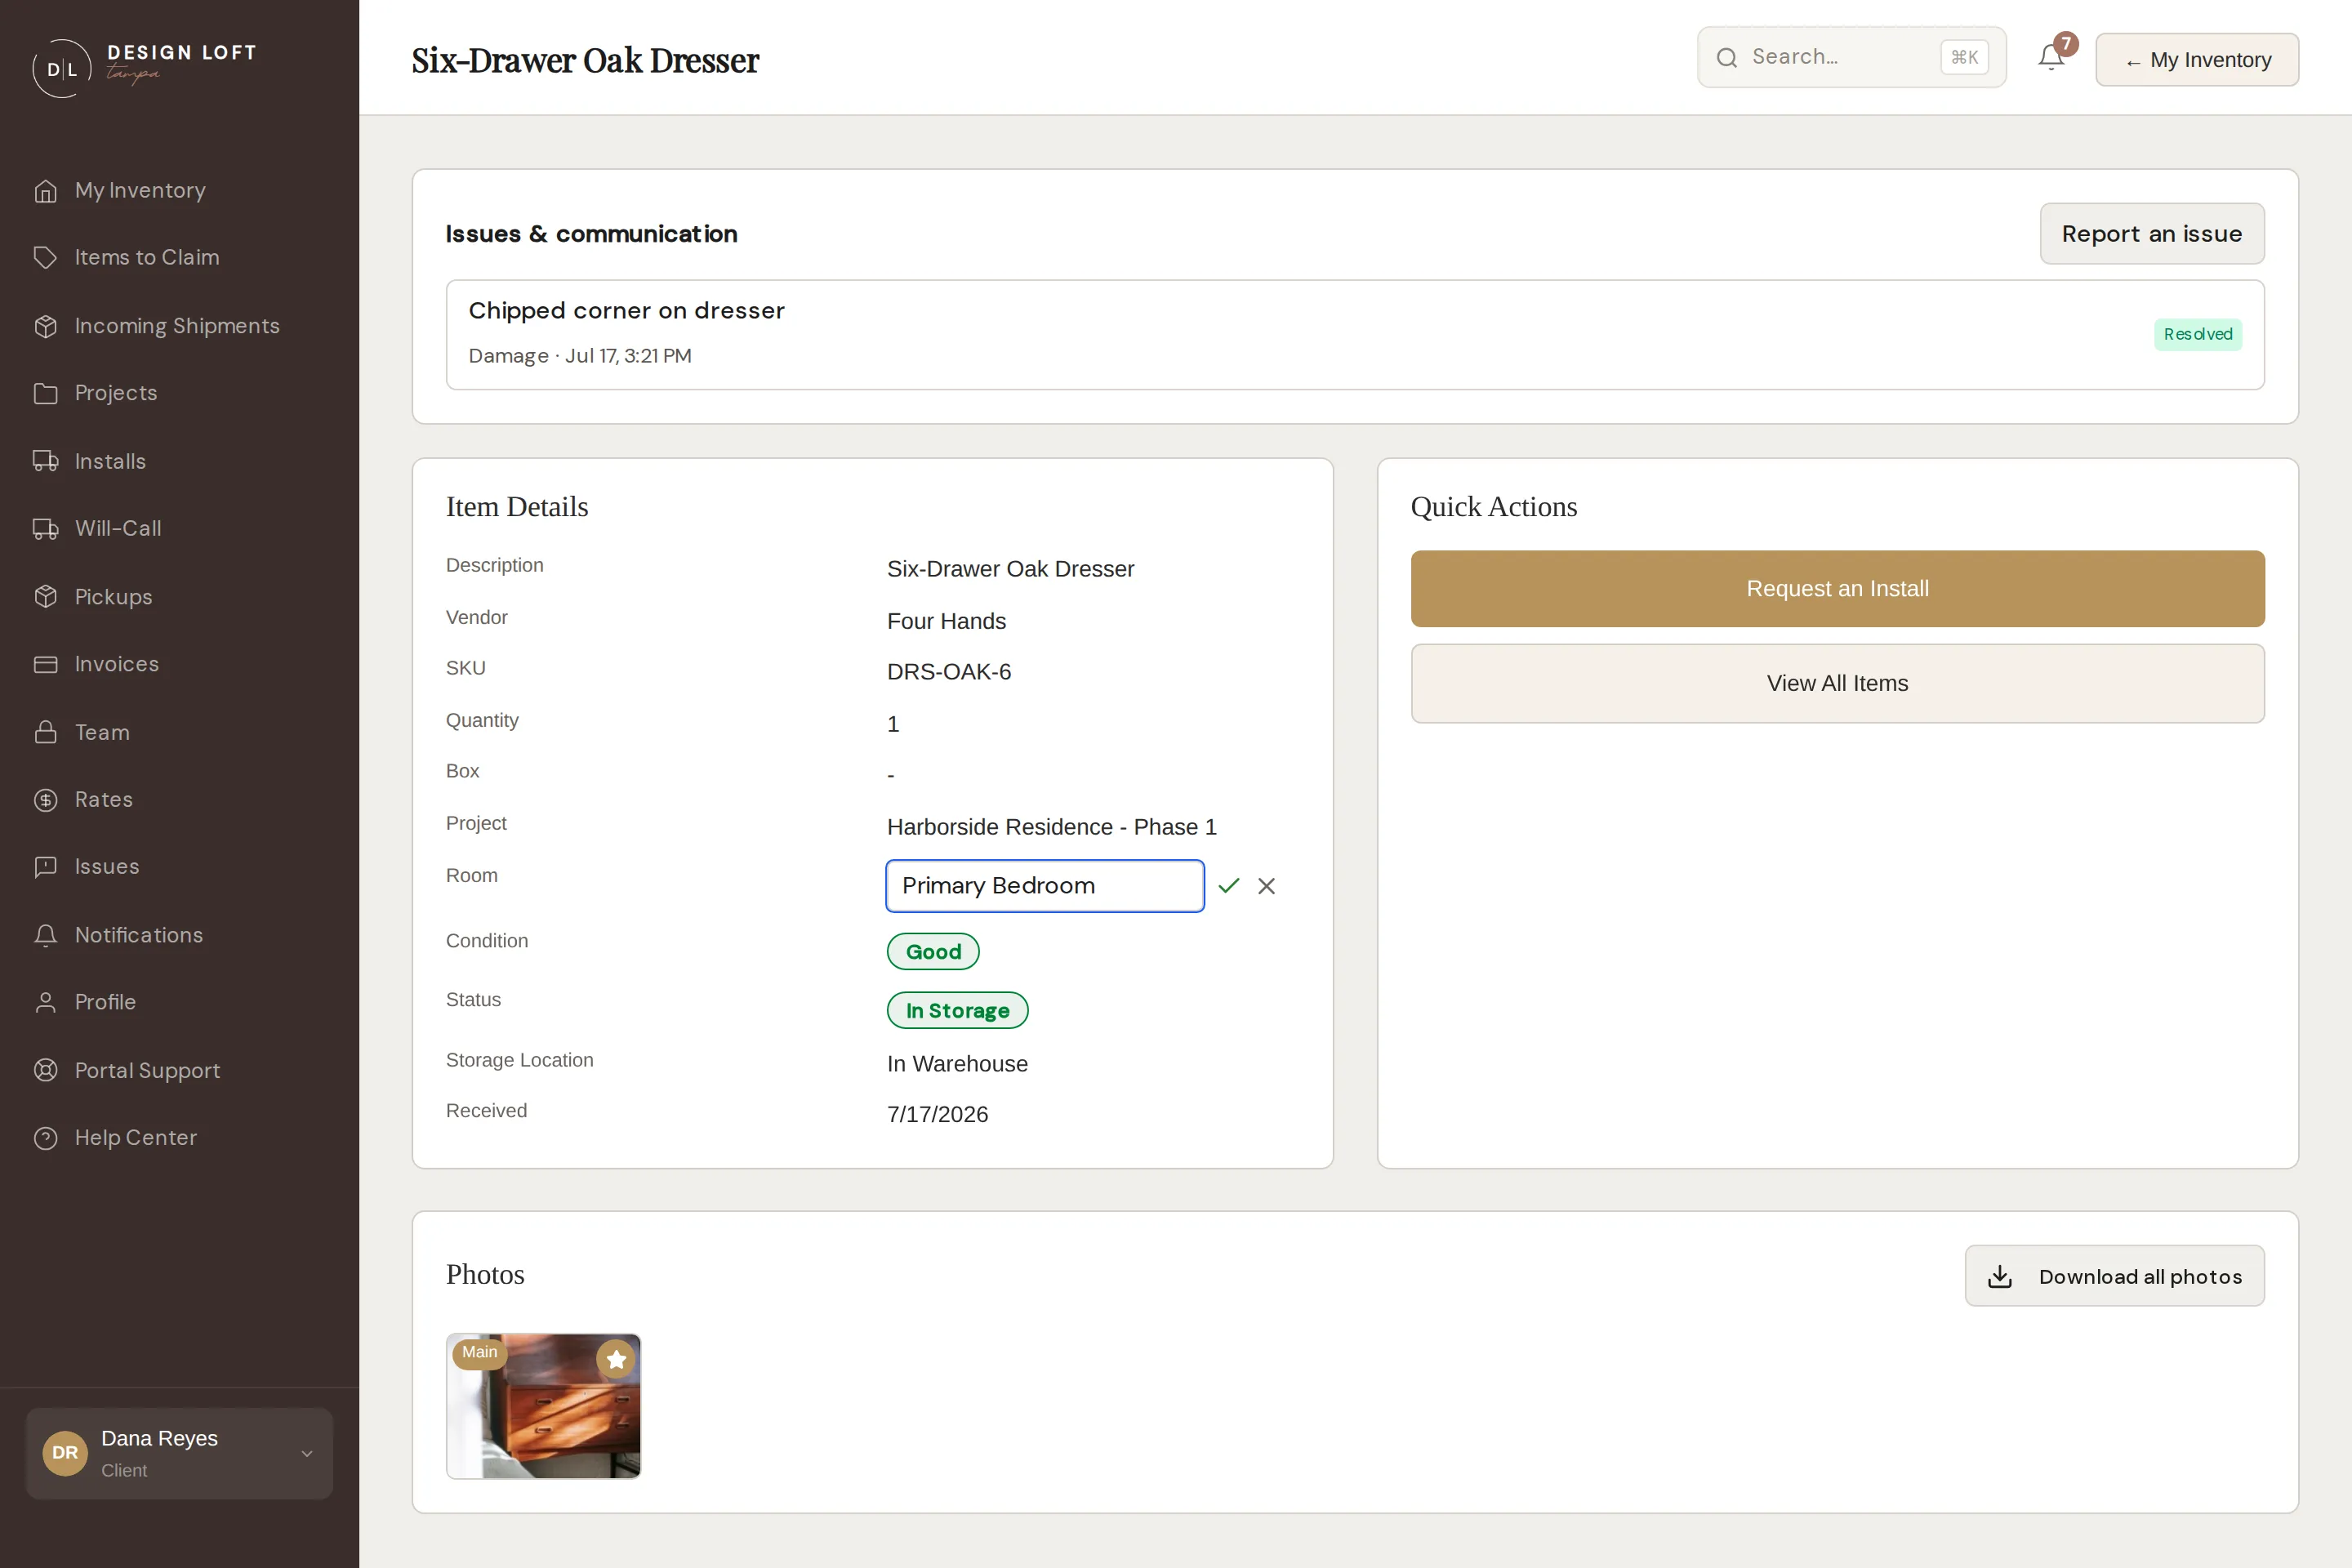
A few things worth knowing:
- Rooms you put on an imported order list come across on their own, so most pieces already show a room by the time they reach your inventory. Anything that arrived without one reads Not set until you fill it in.
- To clear a room, delete what is there and save.
- Room is searchable - type a room name into the search box on My Inventory to pull up everything headed there.
- Filling it in helps us too: the room shows on our crew’s pull list, so on install day they know where each piece is going.
Choosing the main photo
Section titled “Choosing the main photo”Receiving photos often start with the box, not the piece inside. To put the best shot first, rest your pointer on any photo in the gallery and click the star that appears: that photo becomes the item’s main photo, marked Main, and leads the item’s pictures everywhere in the portal - inventory thumbnails, the photo gallery, and the item picker on install requests. Click the star again to unset it.
Prefer a closer look before you decide? Click any photo to open it enlarged, then use the star at the top of that view. It updates instantly, so you can keep flipping through the other photos and compare before you settle on one.
(Photos from older imports may not offer a star - only pictures we took and store for you can be made the main photo.)
Downloading every photo of a piece
Section titled “Downloading every photo of a piece”Filing a claim with a vendor, a carrier or an insurer usually means sending them every picture of the piece. Rather than saving photos one at a time, click Download all photos at the top of the Photos section. Your browser saves a single zip file named after the item, with the pictures sorted into folders:
- Item photos and Box photos - what we took when the piece arrived and was unboxed.
- Damage photos - the damage pictures we sent you with a damage report.
- Issue folders - the photos and PDFs shared in each conversation about the piece, one folder per conversation.
- Returned to warehouse - photos taken if the piece came back to us after leaving.
- Shipment manifest - the packing list that came with the delivery, when we photographed one.
- Vendor stock photos - any picture that came from the vendor’s website, kept apart so it is never mistaken for a photo of your actual piece. See Pictures that came from the vendor.
The same button is at the top of any conversation about the item in your Issues inbox, so you can grab everything while you are writing up the claim.
A big set can take a moment; the button counts the photos as it goes. If one cannot be fetched, the zip still downloads with the rest and includes a short file naming what is missing, so nothing quietly drops out of a claim.
Pictures that came from the vendor
Section titled “Pictures that came from the vendor”Nearly every picture in the portal is ours: taken at our dock as the box was opened and the piece inspected. A few are not. When we have nothing of our own to show yet, we sometimes pull the picture from the vendor’s product page so the item is not a blank square. A catalog picture is a styled marketing shot, though, and it is often a different fabric, finish, or colorway than the one the factory actually built for you.
So we label them. Any picture that came from a vendor’s website carries a Stock photo badge, and the item’s page says so in plain words underneath the gallery.
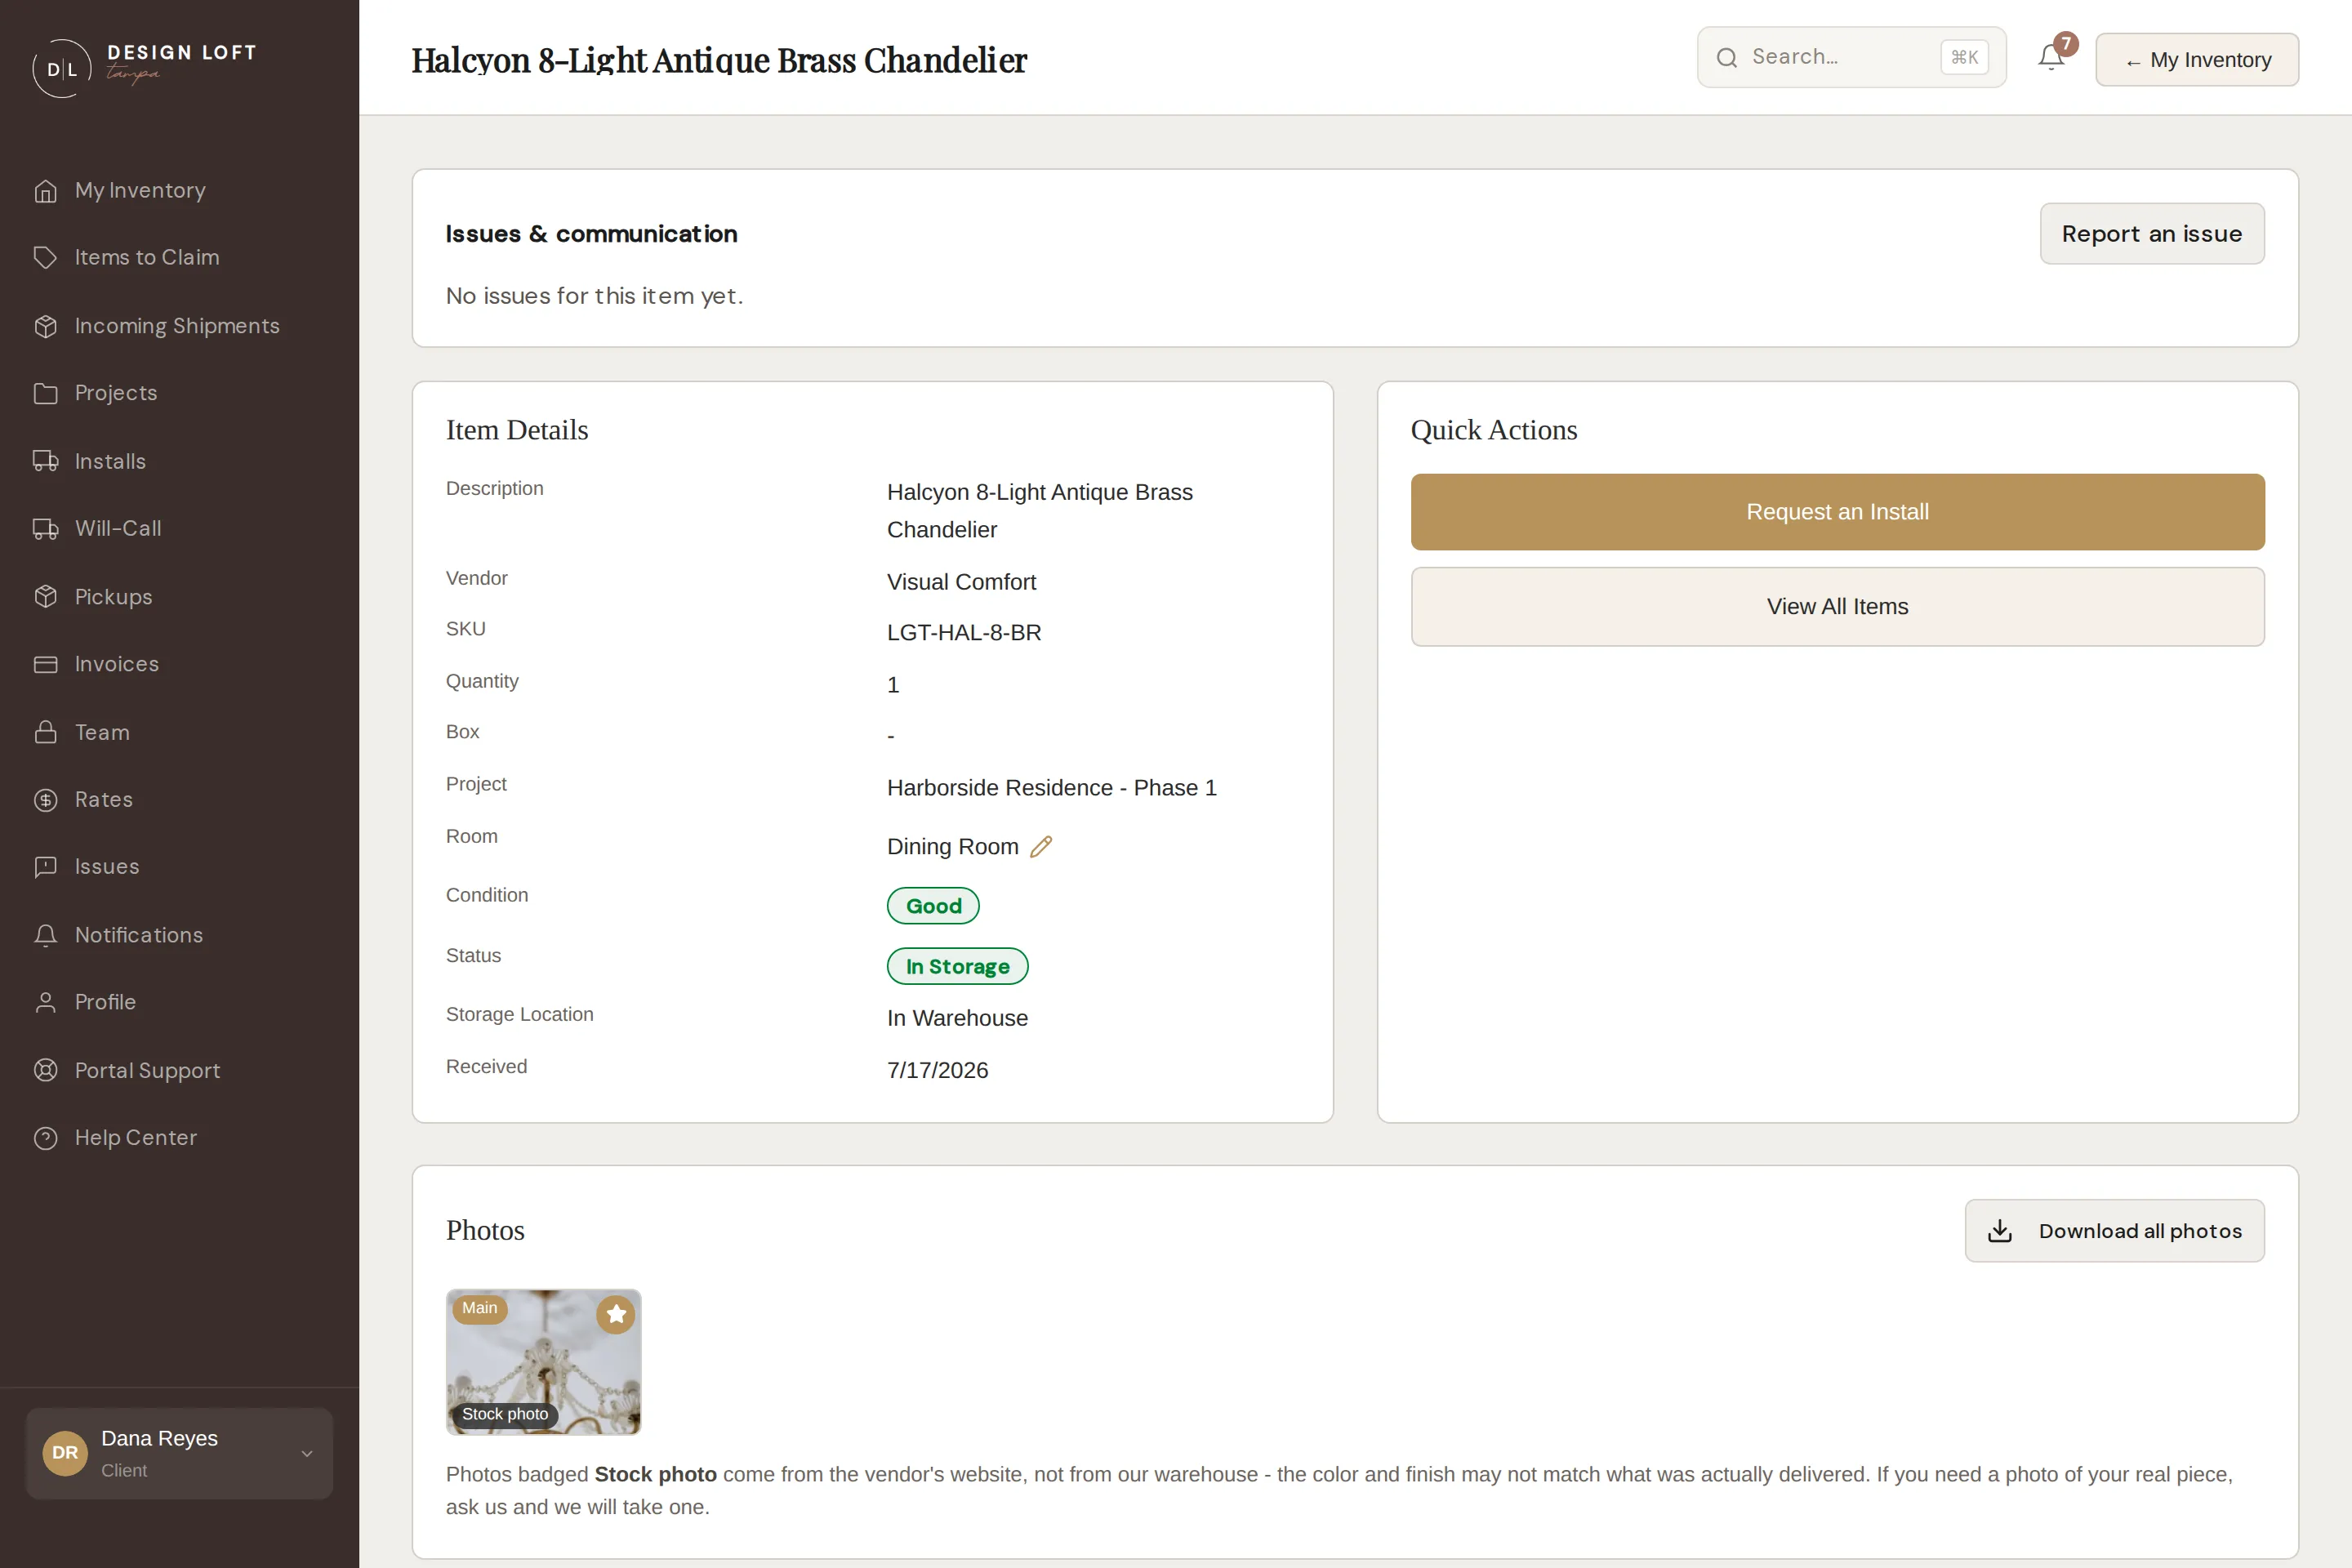
Where the label shows up:
- On the item’s page. A Stock photo badge sits on the corner of the picture. Click the picture to see it enlarged and the full warning appears with it: supplied by the vendor, not a photo of your actual item, and the color and finish may differ.
- In Grid view on My Inventory. The item’s card carries the same Stock photo label.
- On a piece’s row in the list. A thumbnail that small has no room for a label, so it gets a little shop symbol in the corner instead. Rest your pointer on it for the explanation.
Two things worth knowing:
- Our own photos always come first. A vendor picture only leads an item, and only picks up that label in a list, when we have no photo of the real piece to put there instead. The moment a real one exists it takes the front and the vendor picture moves behind it. (If you deliberately make a vendor picture the main photo, it stays in front and keeps its badge.)
- You can ask for a real photo. If a piece is still with us and you need to see the actual finish before you sign off on it, tell us and we will go photograph it.
Vendor pictures are also kept out of the emails we send about damage, so a claim is never illustrated with a marketing shot.
Seeing what shipped in the same box
Section titled “Seeing what shipped in the same box”Multi-box shipments are easier to check when you can see each box’s contents. Select the Box link on an item’s detail page to open that box’s page: the label ID printed on it, its condition, its size and weight, its photos, and every item still packed inside it, with quantities. Under each item’s name is your spec code, if it has one, and its model number (SKU).
Contents is what is in that box now, so a piece that has since been installed, picked up by your crew, or sent back to its vendor is not on the list. When that has happened, a line under the heading says how many pieces from the box have been closed out and links you to the search that finds them - see Pieces that have left our care. A box whose contents have all gone out reads “Nothing from this box is still with us” rather than showing an empty list.
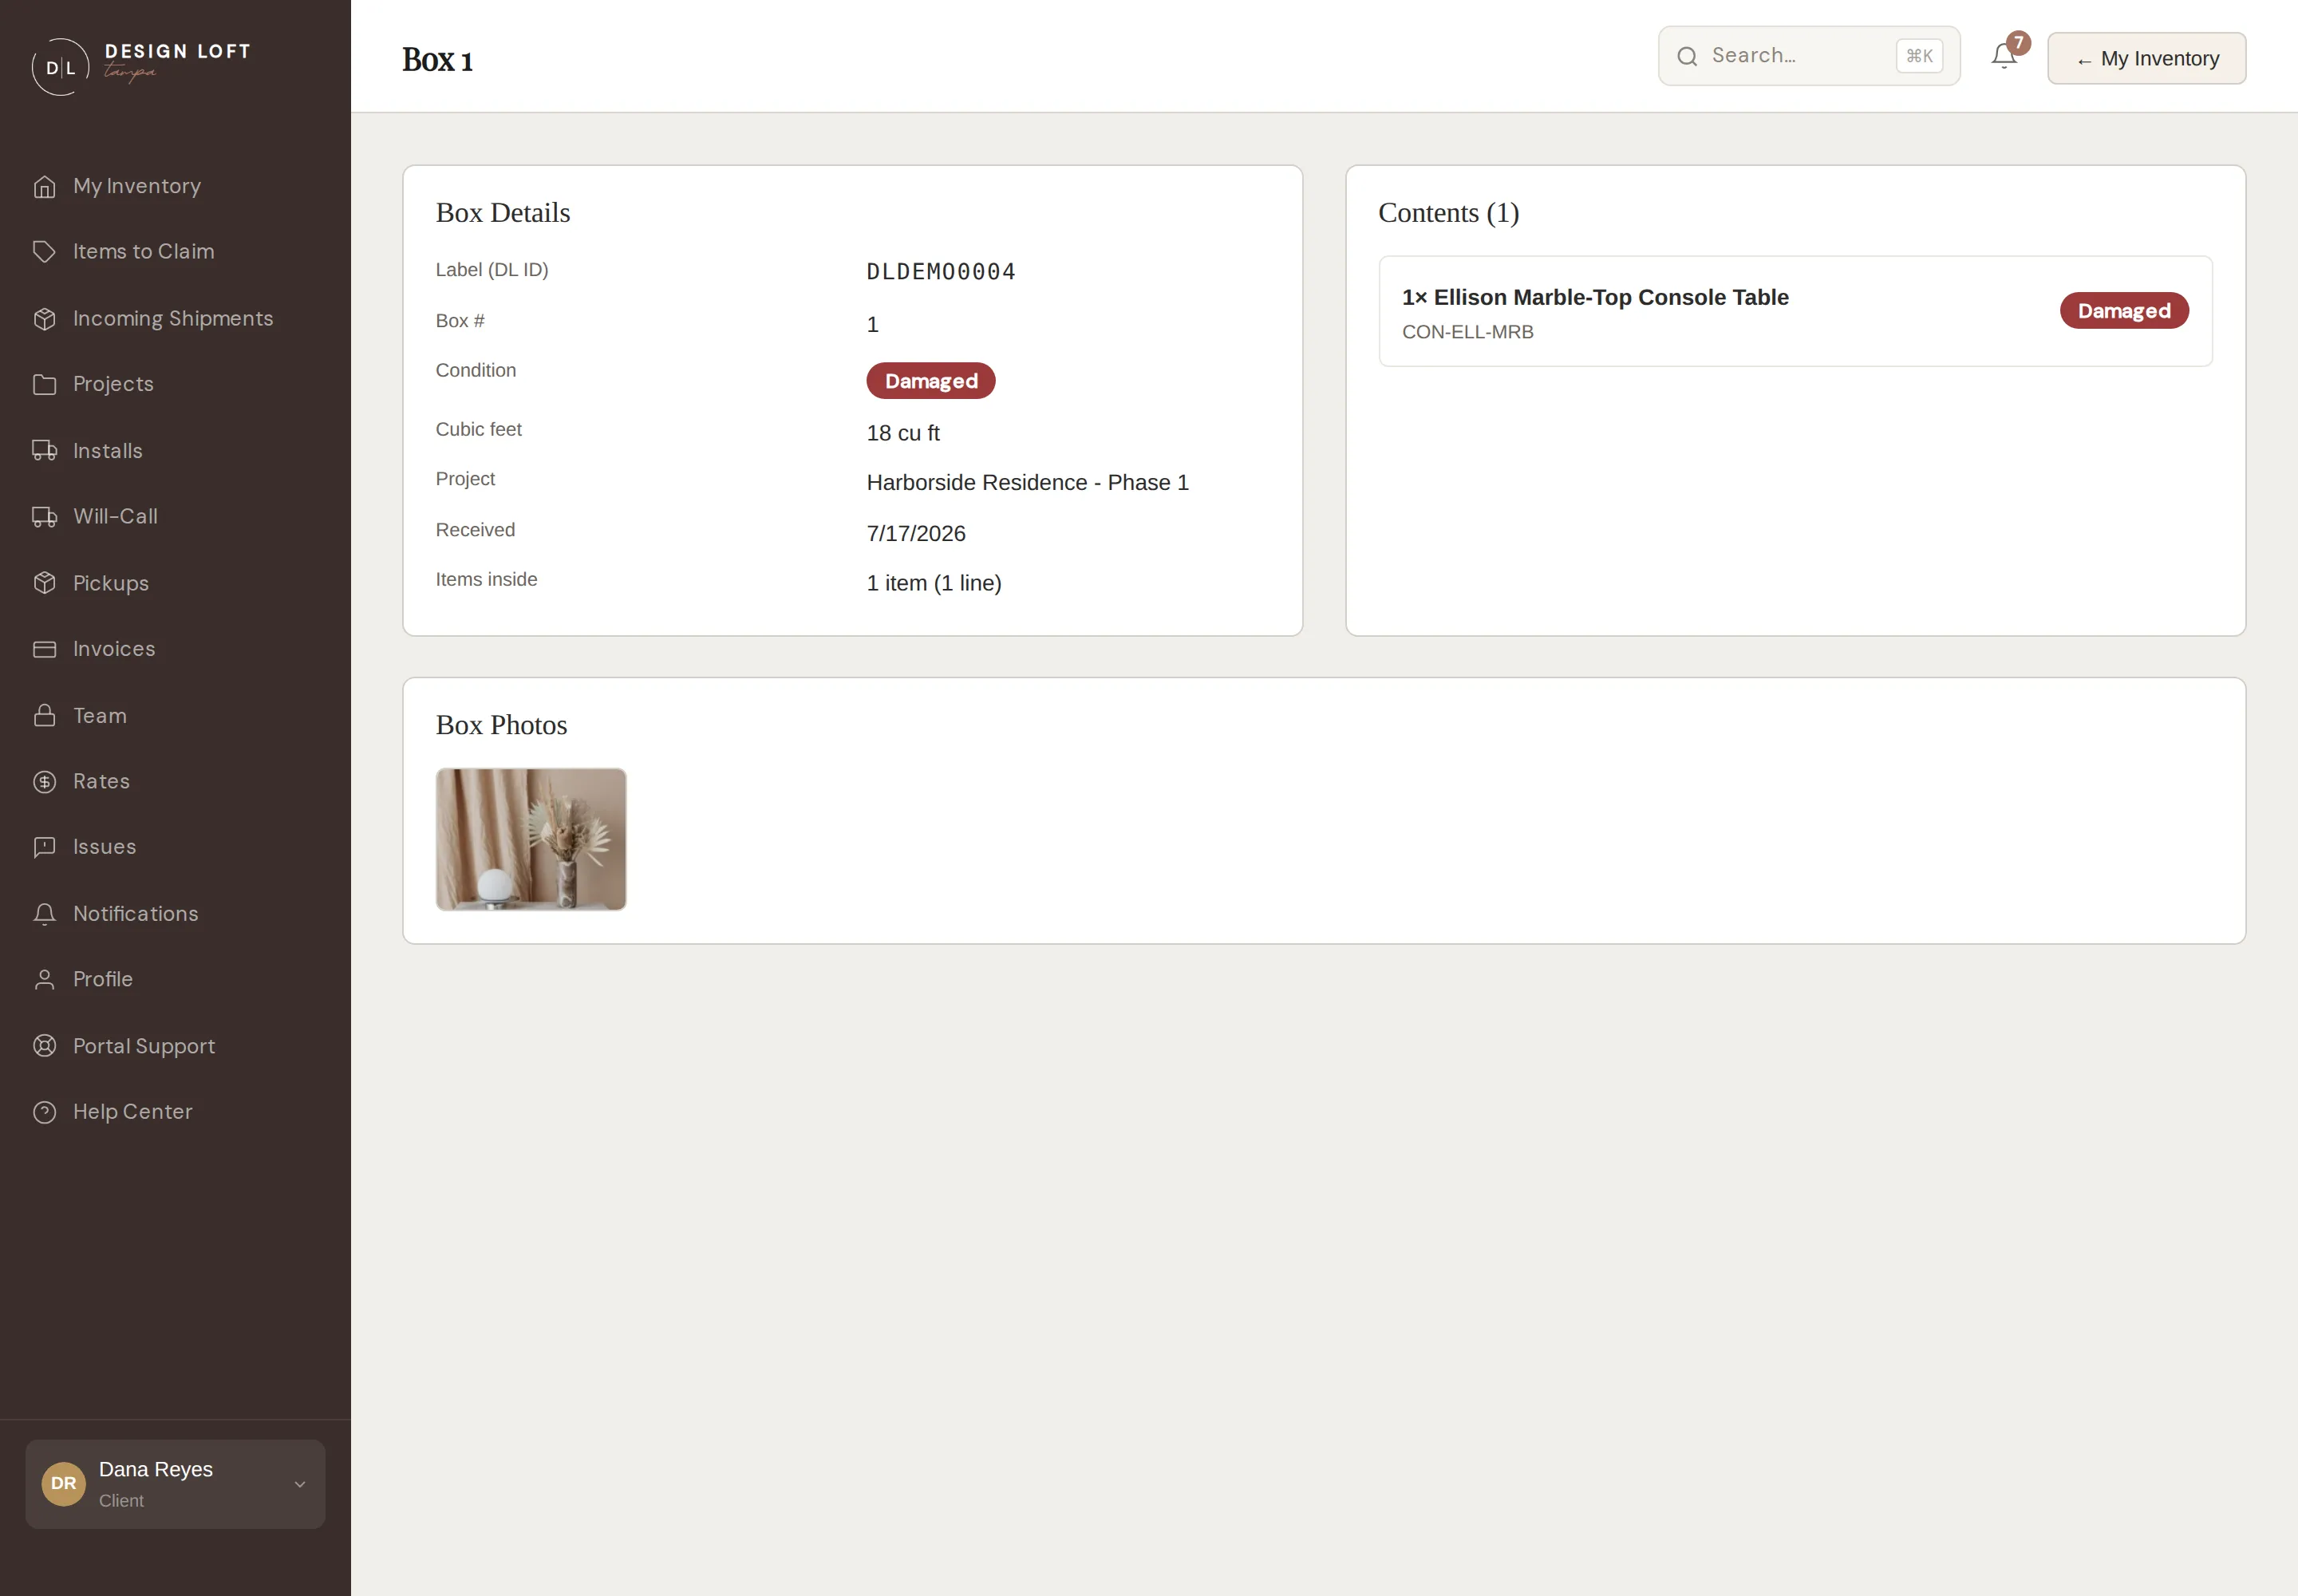
How big the box is
Section titled “How big the box is”Boxes are measured and weighed as we check them in, so you can plan the move before install day - what will fit in the van, what needs two people, what will never make the turn at the top of the stairs.
- An item’s page shows Box size: the dimensions and weight of the box the piece came in, for example 24 × 18 × 12 in · 42 lb.
- The box’s own page breaks the same measurements out as Dimensions, Weight, and Cubic feet - cubic feet being the storage space the box takes up, which is what the storage line on your invoice is based on.
- Sizes also sit under each box ID in My Inventory, so you can size up a whole project without opening pieces one at a time.
These lines appear only where we have the measurement. Items that came across from our previous system were often never measured, so their pages skip the size rather than show blanks. A recently received piece can also show its size without a weight, when the box was too heavy or too awkward to get on a scale on arrival day; we add the weight once we can. Need a measurement sooner, or one on an older piece? Ask us and we will put a tape on it.
If a piece reads Damaged
Section titled “If a piece reads Damaged”Condition on the item page reads Damaged (or Missing parts) when we find a problem with the piece, whether that was at the dock or later, when the box was opened and the piece inspected. The issue opened for it holds the rest of the story: what we found in the inspector’s words, close-up photos of the damage, and, when several of the same piece sit on one line, how many of them are affected.
One of our managers checks the photos and the wording before a damage report is sent to you. A damaged box on its own does not change the condition: the piece keeps reading Good until that report is sent, and stays Good if the damage never reached it. When our team marks the piece itself, the condition changes first and the report follows, so it can read Damaged for a short while before the conversation about it arrives. See We check a damage report before you get it.
Those close-ups live in the issue thread rather than in the item’s gallery, on purpose - the gallery stays a clean record of how the piece arrived and what it looks like, and the damage report stays a record of what is wrong with it.
Quick actions
Section titled “Quick actions”While an item is In Storage, the detail page offers Request an Install to start an install request with this item preselected.
If an item goes back to the vendor
Section titled “If an item goes back to the vendor”When a piece has to return to its vendor - a damage replacement, say, or a wrong item shipped - we arrange the pickup from the warehouse. The item’s page then shows a Vendor Return section with where things stand, and we notify you when the pickup happens. Once the freight company has collected the item, the paperwork appears there for you to download: the signed pick-up release, plus any return-authorization documents the vendor issued.
The pickup is also when the return is billed. A vendor return is priced the moment the driver signs - the same per-piece pull charge as an install or a will-call, plus the piece’s storage for the month it left and its receiving if that had not been invoiced yet - and it arrives on a small invoice of its own rather than on your next monthly statement. That is deliberate: an invoice covering only the return is easy to send to the vendor along with your reimbursement claim. Your account manager will find it in Invoices like any other.
A piece on its way back to a vendor is no longer part of your storage, so it leaves the everyday inventory list as soon as the return is set up, and it is not charged storage while it waits for the freight company. To open its page, search for it by name from My Inventory or with ⌘K, or follow the link in the notification we sent - see Pieces that have left our care. The issue thread behind the return stays under Issues either way.
A piece you have already collected can still go back. If your crew picked a piece up and it turns out to be defective, damaged, or simply the wrong thing, bring it back to us and we will put it on the vendor return from here - see If a piece has to come back. Its page reads Return to Vendor the day it arrives, the Vendor Return section appears on it, and from there the return runs exactly as above: we arrange the freight pickup, notify you when it happens, and file the paperwork for you to download.