

Tracking install requests
Installs in the sidebar lists every install request you have made: the job it is for, when you asked, the install date, the item count, the service level, and where it stands. Project is the first column, so you can pick the Harborside install out of a list of six without opening any of them. The Install Date column shows the confirmed date once we have scheduled your install; until then it shows the date you asked for. A job booked across several days shows the whole run in that column, like 8/5/2026 - 8/7/2026 - see When an install runs more than one day. Date holds appear in the same list, with their own statuses.
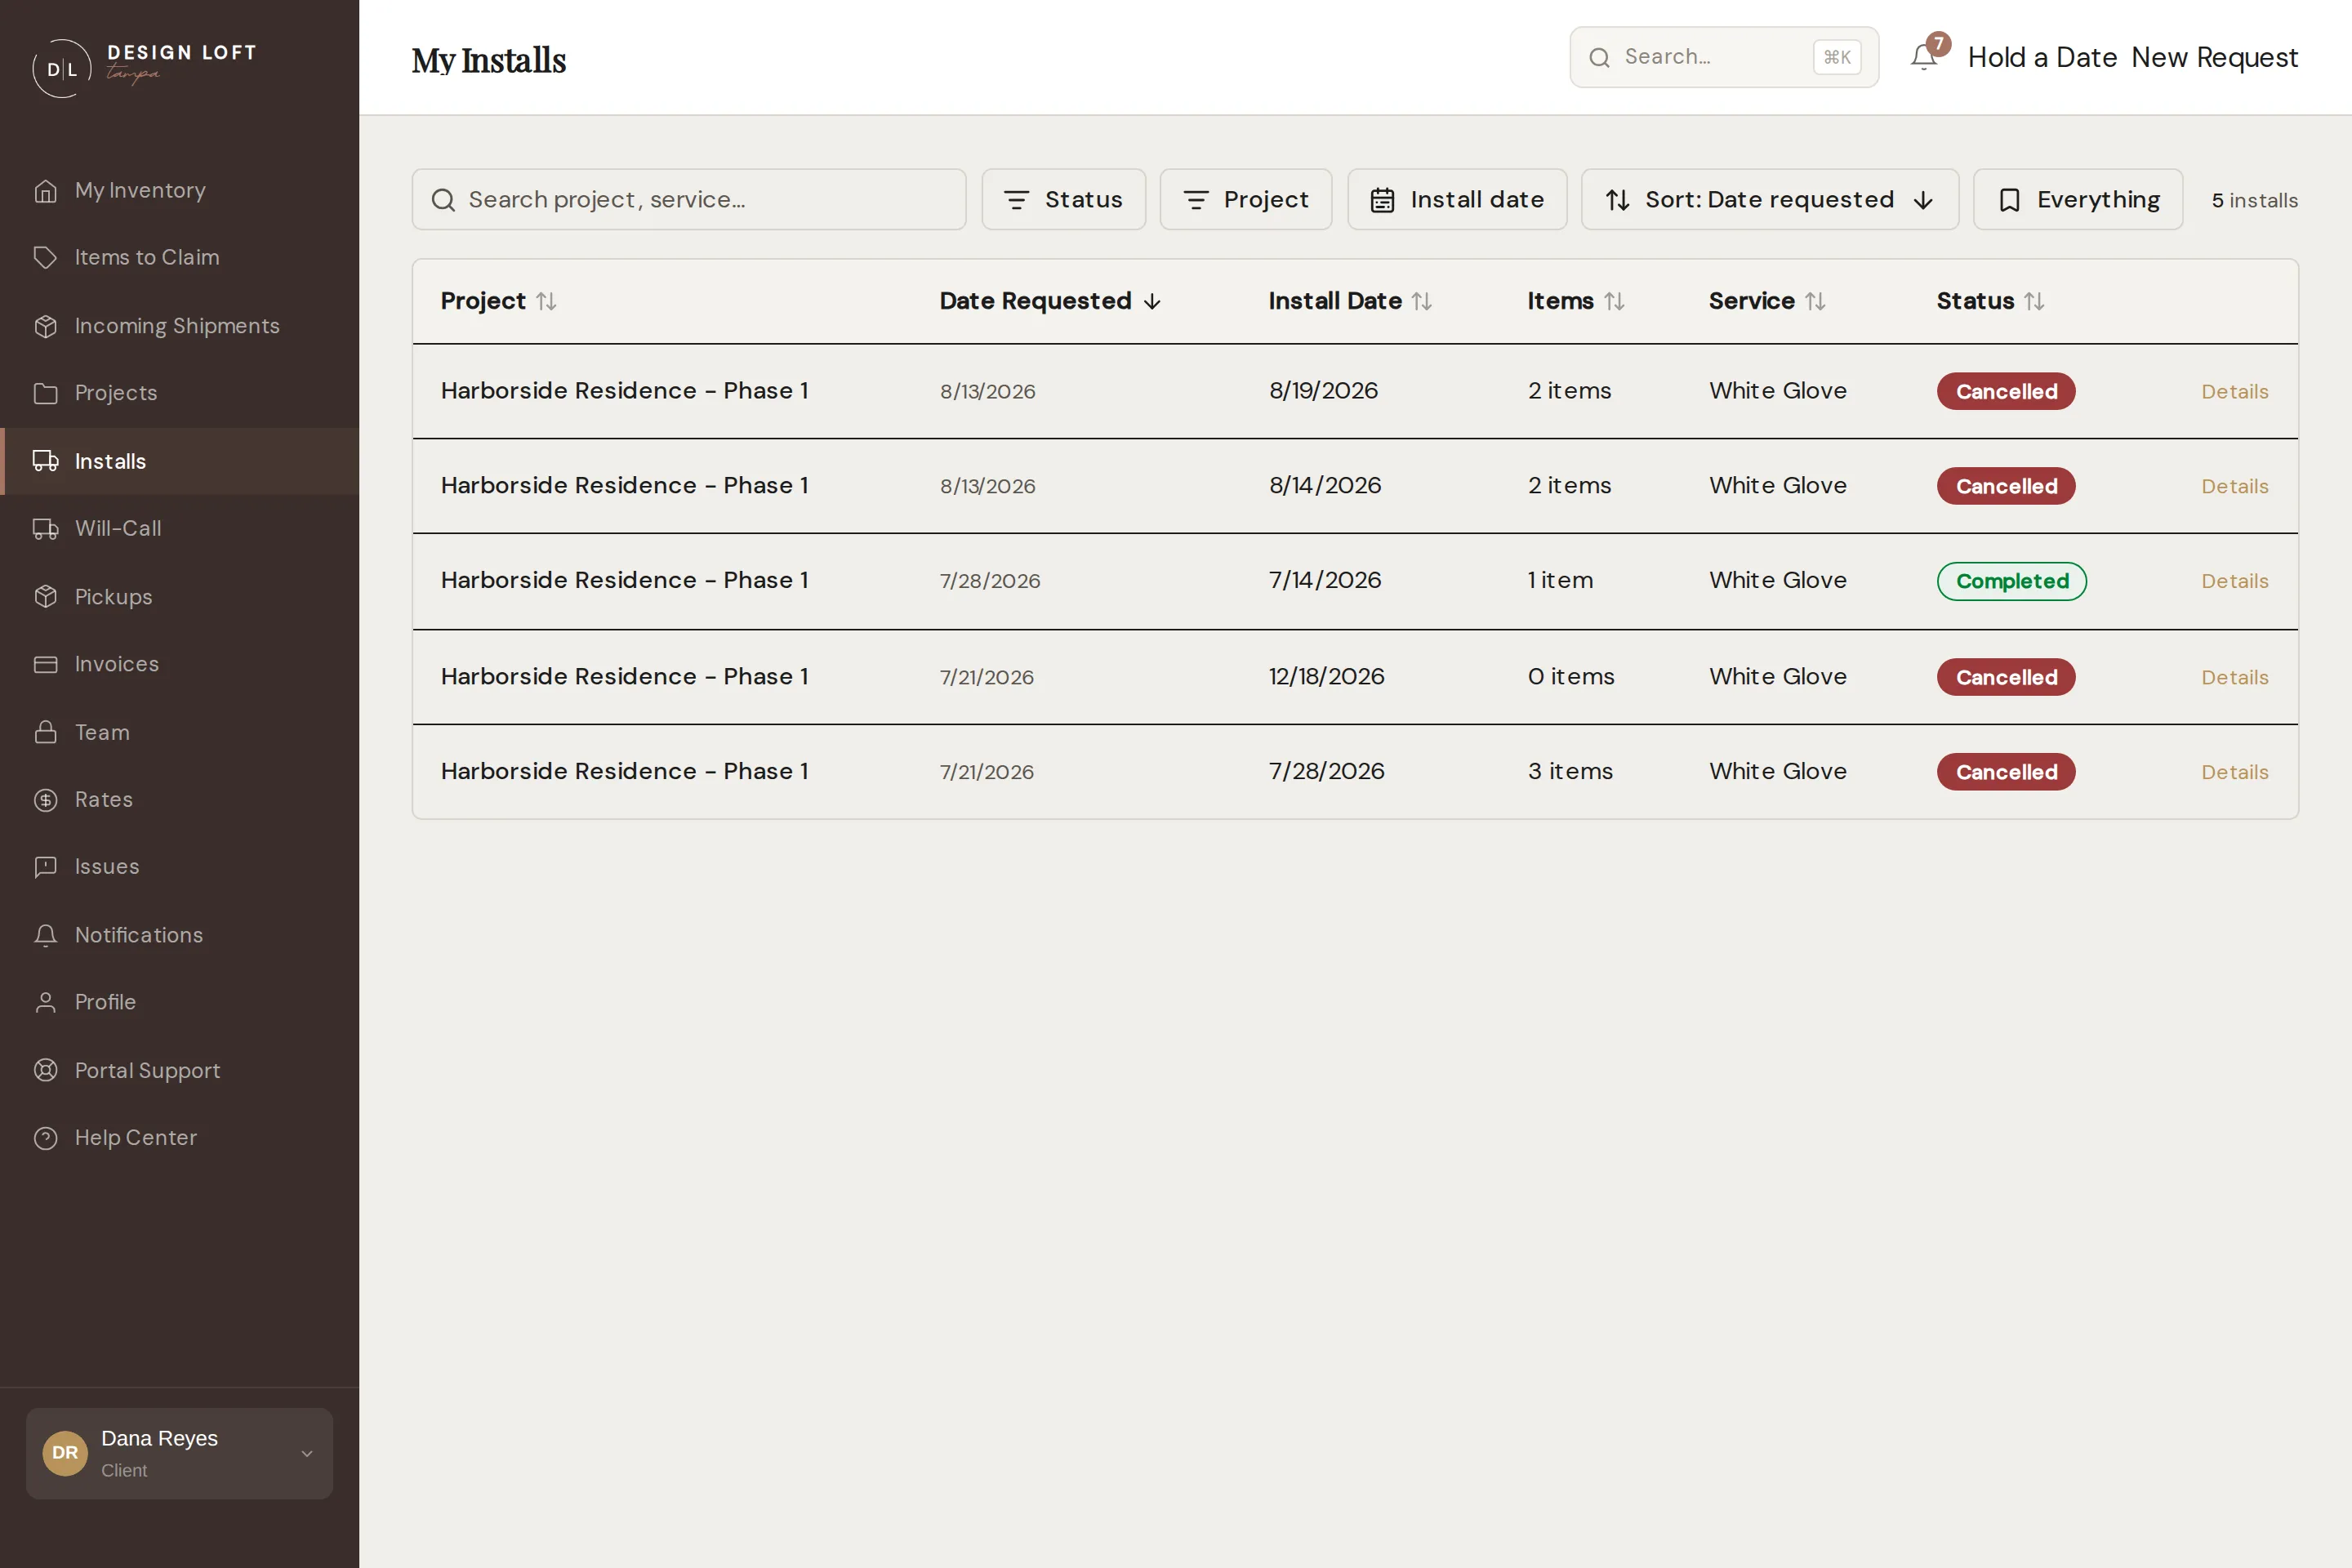
Click Details on any row to open that request’s own page.
Finding one request in a long list
Section titled “Finding one request in a long list”A busy season fills this page up, so there is a bar above the list for narrowing it down to the request you actually want. It only changes what is on your screen - nothing about your requests moves, and there is nothing to save or undo.
- Search matches the job name, the service level, or the status. Type harborside and only that job’s installs stay on screen.
- Status keeps only the requests sitting where you choose - Scheduled, Date Proposed, Completed, Missed Delivery, and so on. The menu offers only the statuses your own requests are actually in, so you can never pick one that turns up nothing. If everything you have is at the same status, there is nothing to choose between and the menu does not appear at all.
- Project keeps just the job you pick, or several jobs together if you pick more than one.
- Install date narrows to a window of dates: Today, the Next 7 days, the Next 30 days, or a from and to you set yourself.
- The view button - it reads Everything until you change it - holds three ready-made views. Everything is every request you have made, Upcoming is the work still ahead of you (including date holds and anything waiting on your answer), and Completed is the jobs that are behind you. A cancelled request, a missed delivery, and a released hold sit outside Upcoming - reach those from Everything or the Status menu.
- Sort reorders the list, and so does clicking a column heading: Project, Install Date, Items, any of them. Click the same heading again to reverse it. Install Date starts soonest first, so the top of the list is the next thing happening.
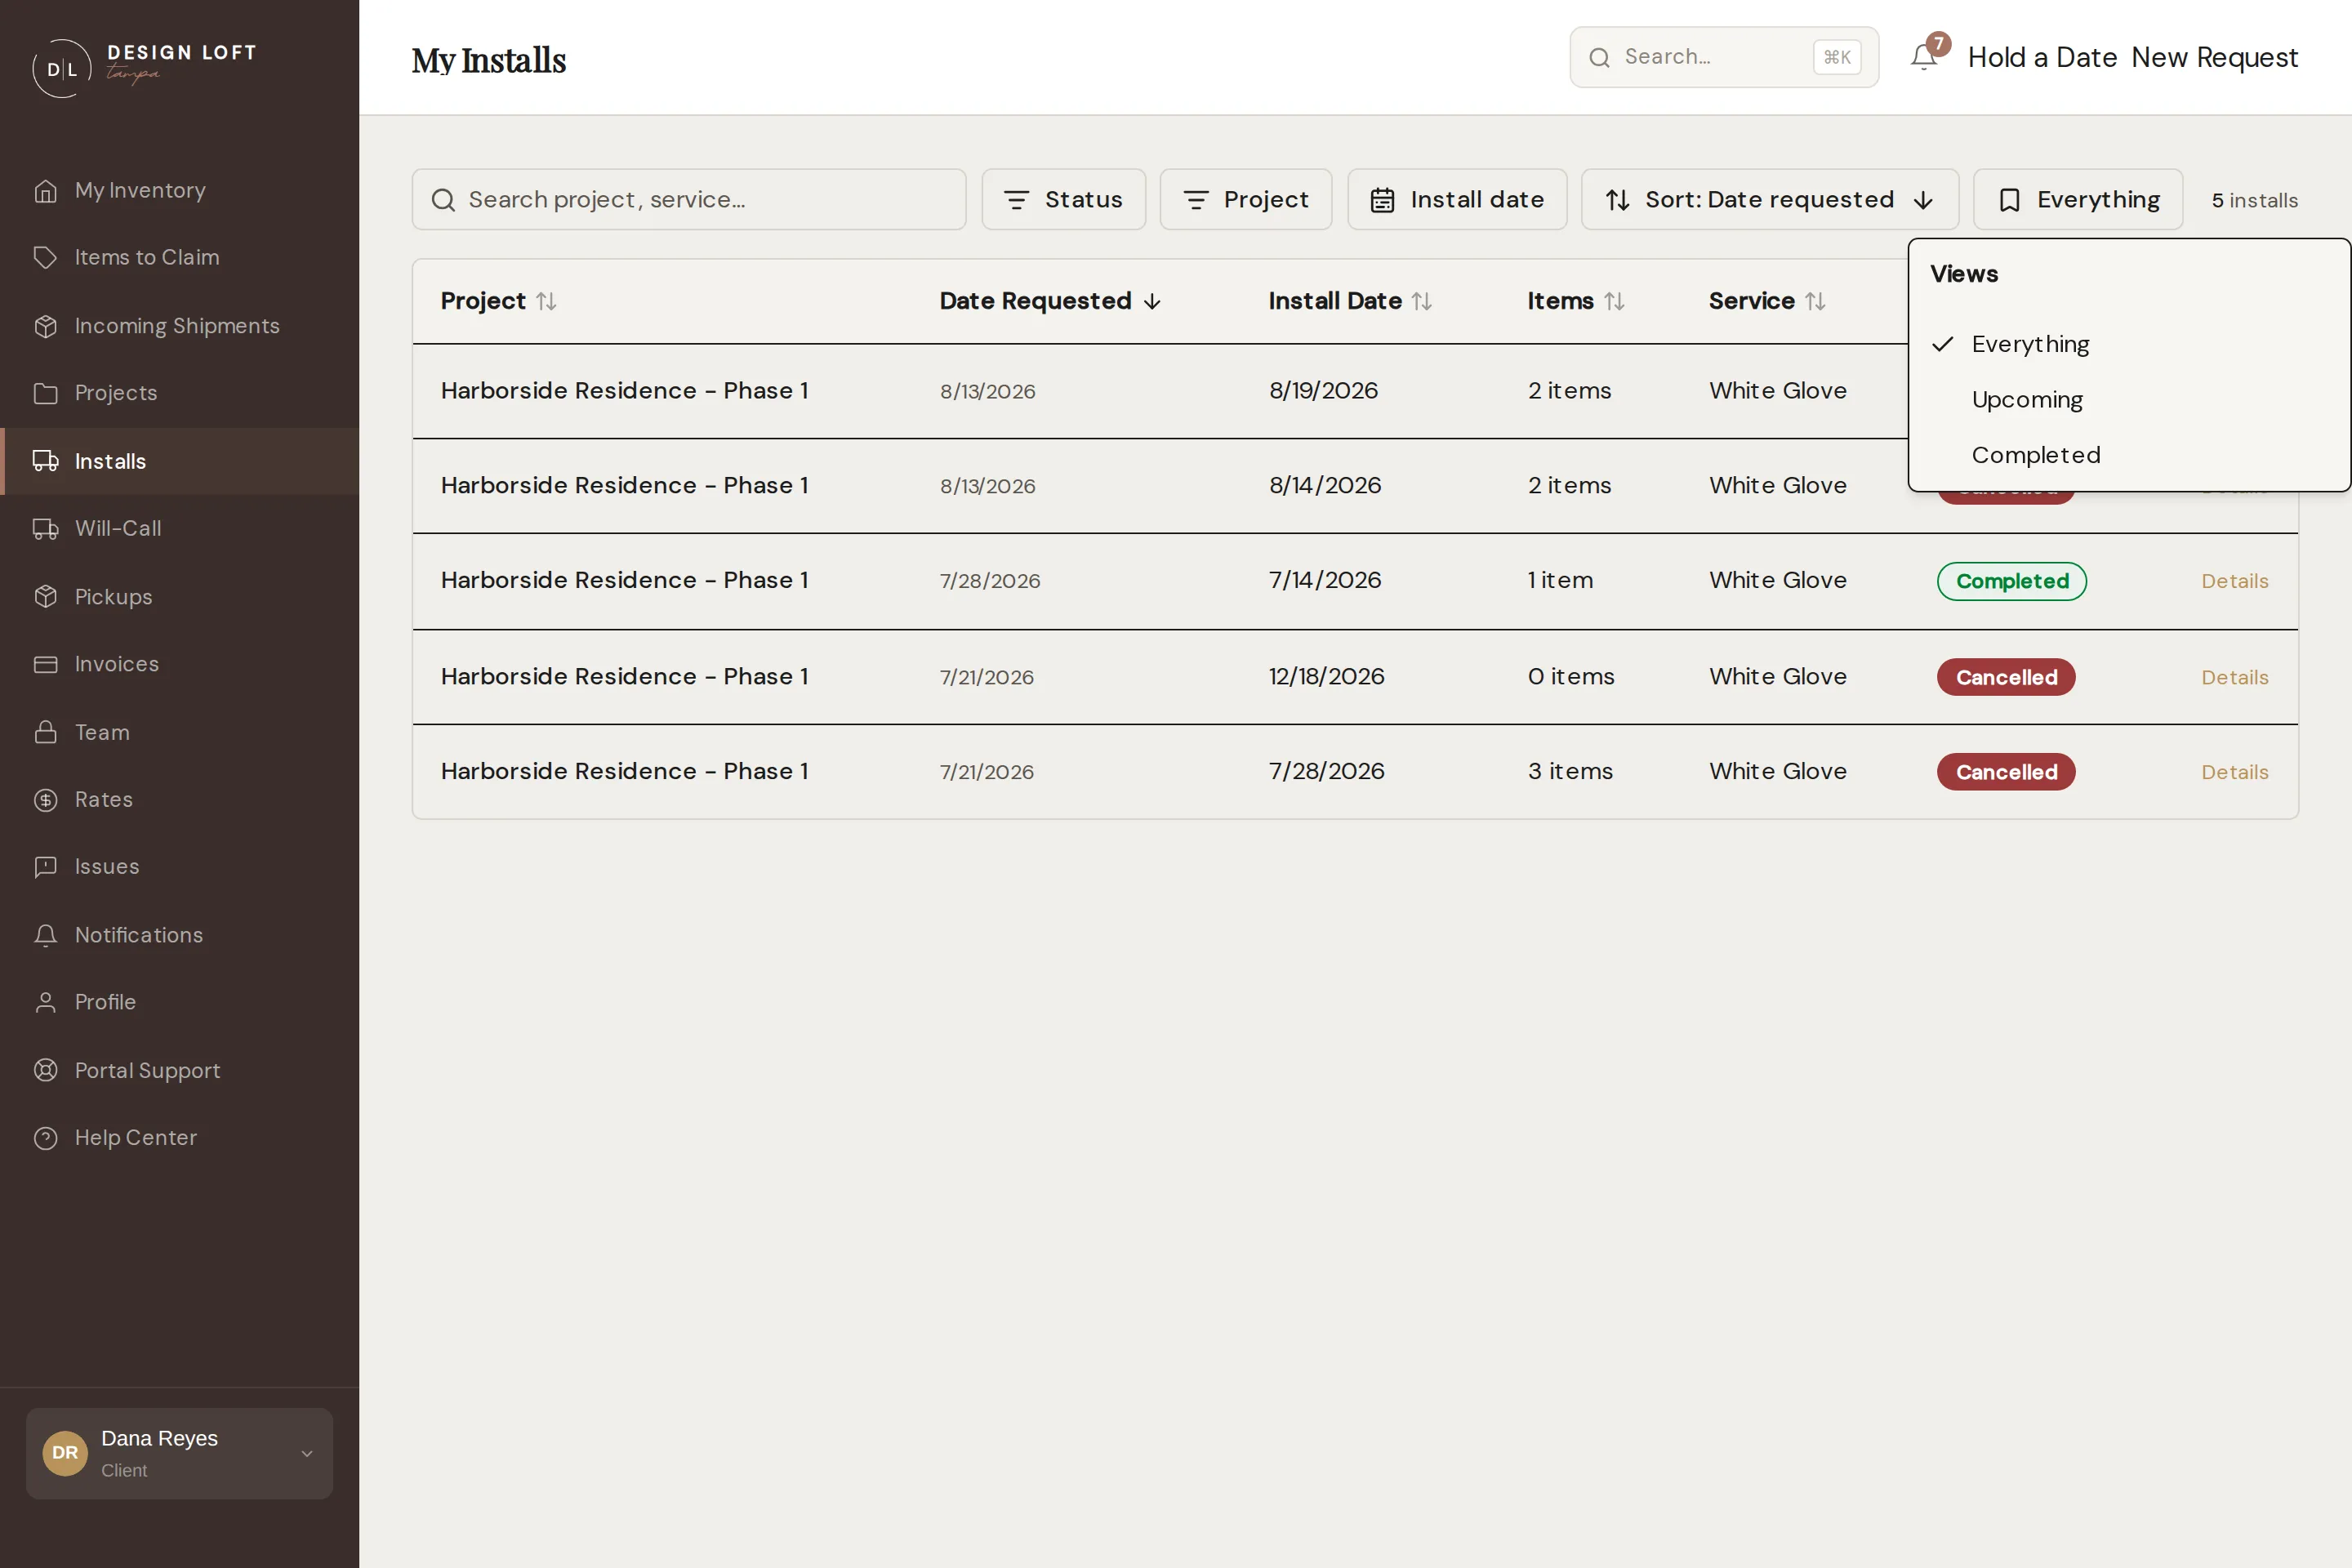
What you have typed, the dates you set, and the menu choices you make yourself all show as small tags under the bar - a ready-made view names itself on its own button instead. Select the × on a tag to drop just that one, or Clear all to go back to the full list. The count on the right says what you are looking at out of what you have, like 3 of 12 installs, so a short list is never mistaken for a missing request.
The list opens the way you left it on the computer you are using, and the address bar keeps up with it - copy the address and a colleague on your account opens the same view. Left alone, it opens the way it always has: every request you have made, newest first.
The request page
Section titled “The request page”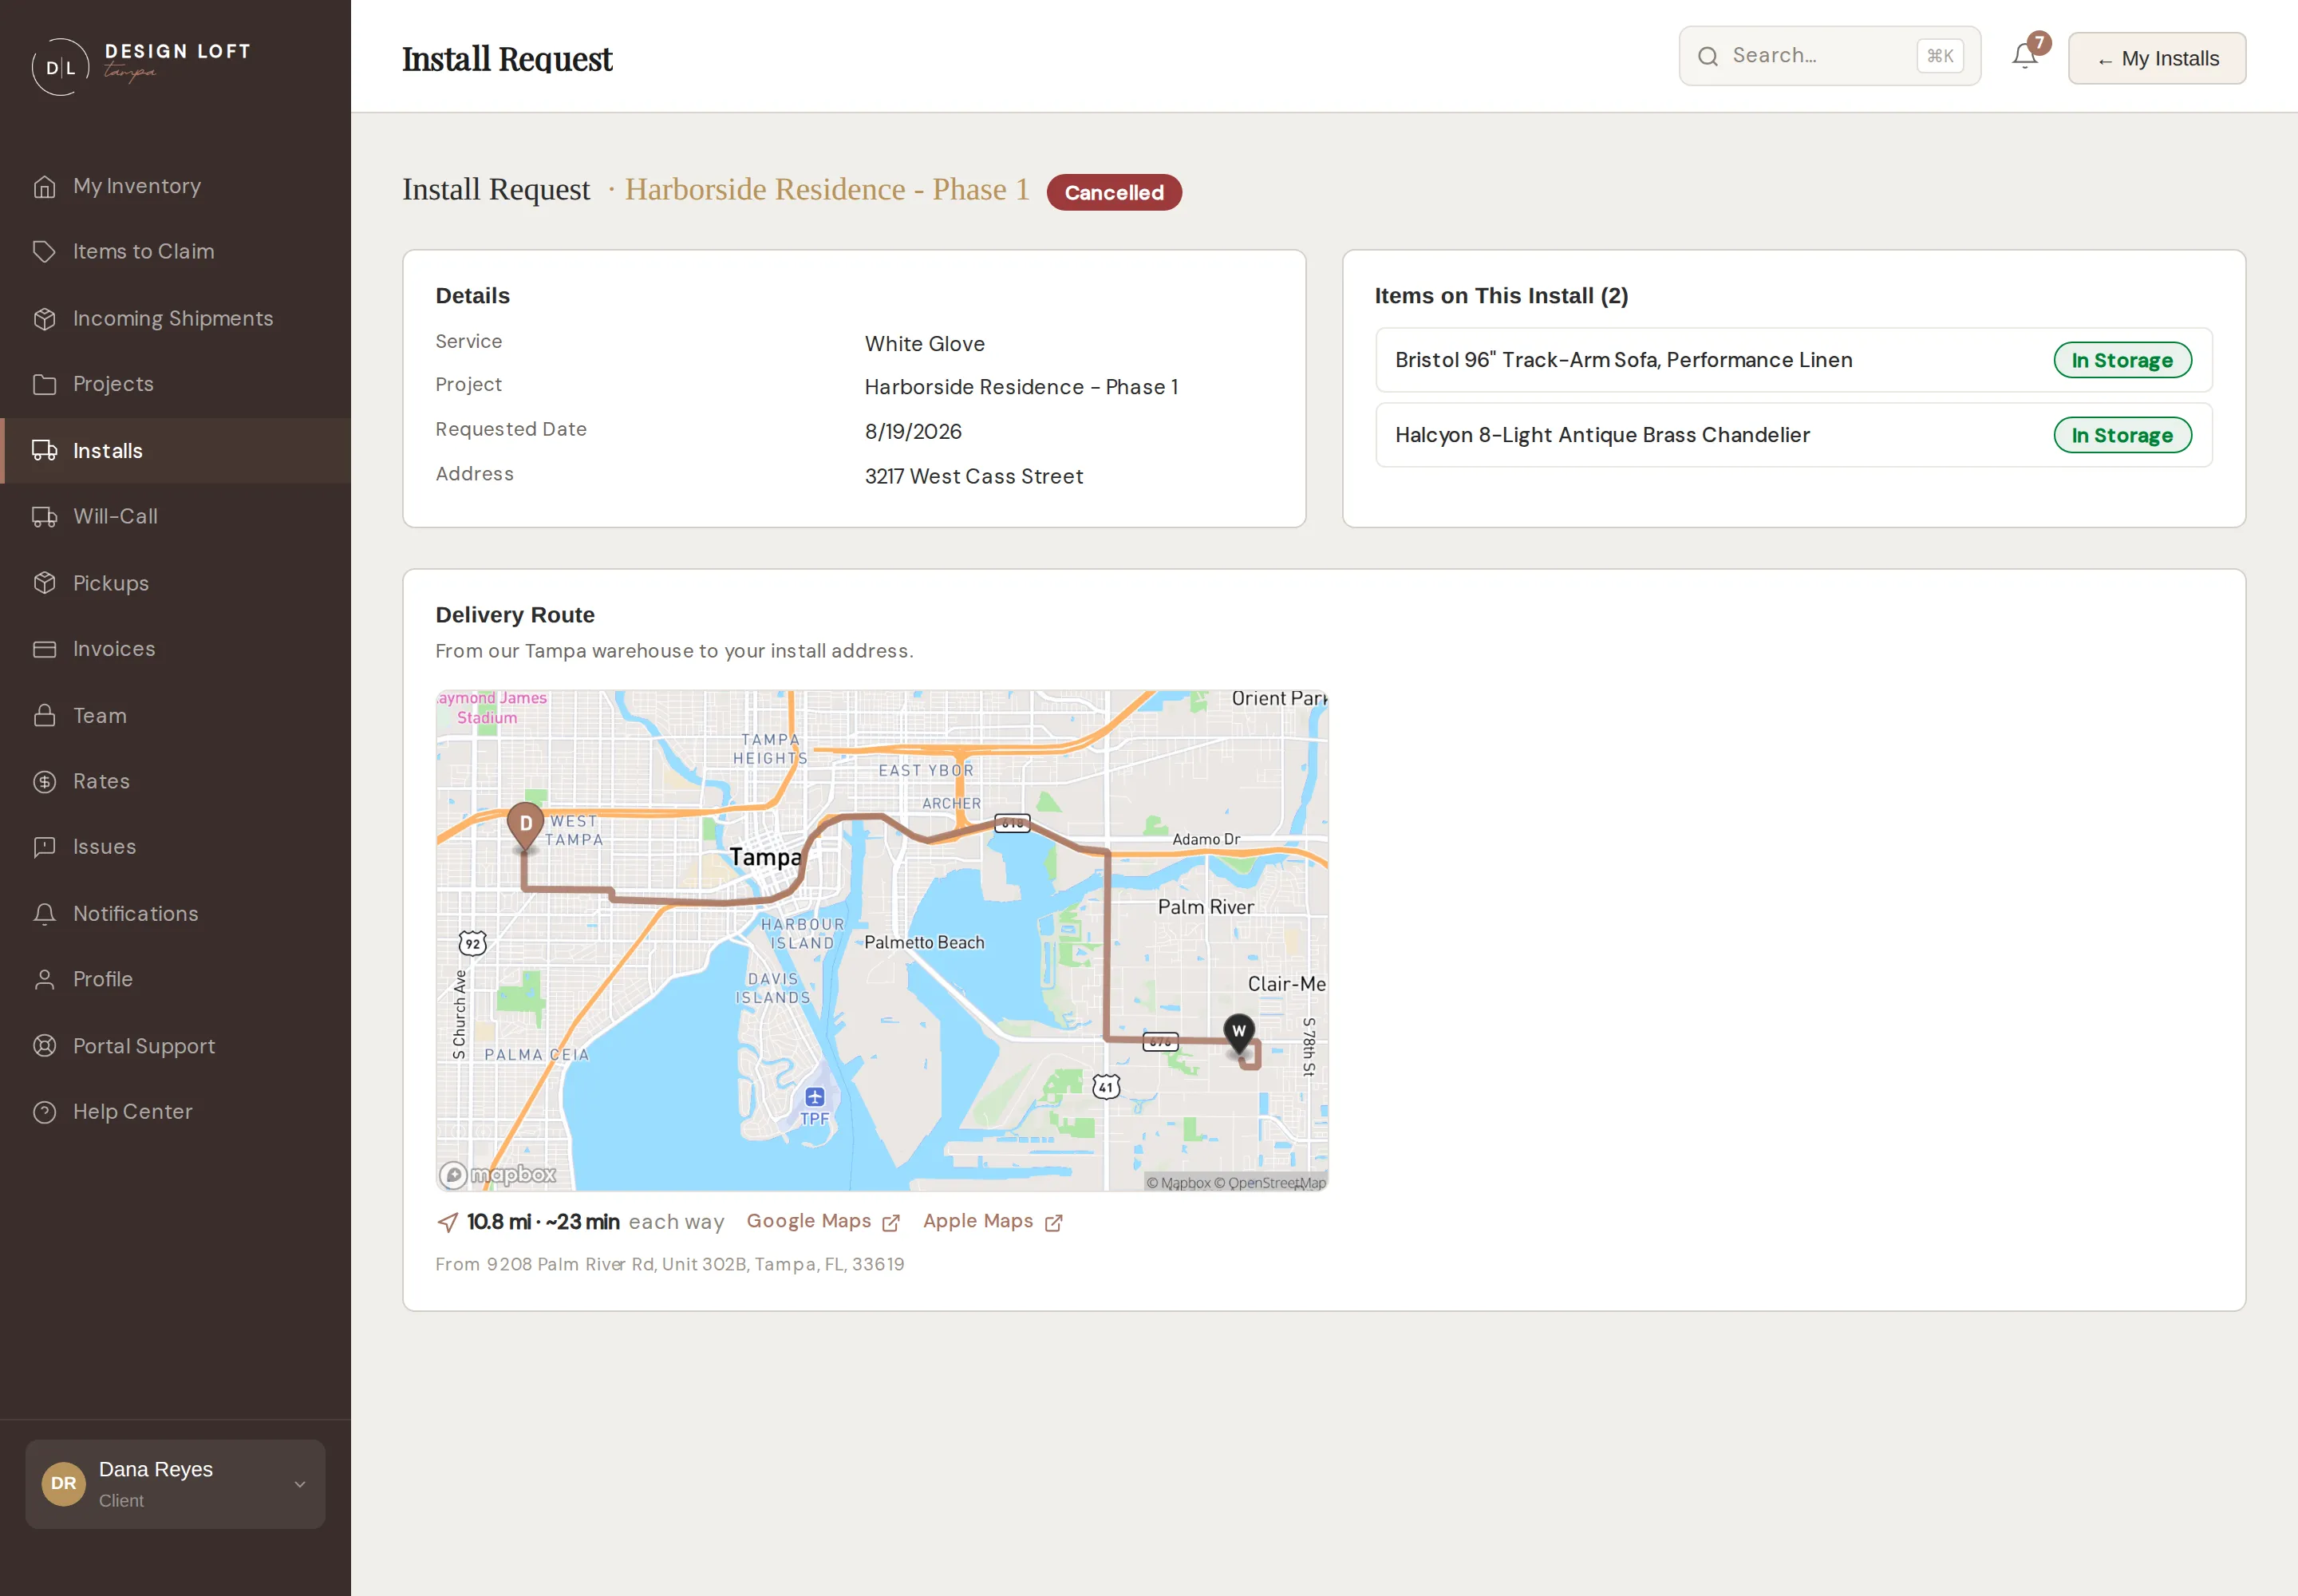
The job the install is for is named right beside the Install Request heading at the top, so the page tells you which one you have open before you read anything else on it.
Each request page shows:
- Estimated cost for this install. What the job looks like it will come to, as a range, with roughly how many hours on site it is based on. It updates as the job changes and it is not a fixed price - see Your install estimate. On a job where your own install company is billing you for the crew, the card is headed Estimated Design Loft charges for this install instead and covers our side of the day only - see If your install company bills you directly.
- Details. The service level, the project it is filed under, the dates you proposed, the date we confirm once we schedule, and the delivery address. A job that runs across several days reads Confirmed Dates and names both ends. If we have suggested a different date, a Proposed Date line shows it as awaiting your approval.
- Items on This Install. Everything on the request, with each item’s current status. Click an item’s name to jump to its full page.
- You’re installing your own items. On a job where the pieces are already with you rather than in our warehouse, this shows the description you gave us, which is what our crew works from. The item list below it stays empty unless you also add pieces from your storage - see Installing items you already have.
- Delivery Route. A map of the drive from our Tampa warehouse to the address on the request - see below.
Which job a request is filed under. You choose the project when you fill in the request form, and that is what the list and the request’s own page name from then on. If we raised the request for you - over the phone, say - and no job was named at the time, we file it under the job the pieces on it belong to, so it stops reading blank in your list. Something filed under the wrong job? Tell us and we will move it.
When an install runs more than one day
Section titled “When an install runs more than one day”A whole-house install rarely fits in a day, so we book the run of days the job actually needs instead of a single date. There is nothing extra for you to do: you propose start dates on the request form as usual, and we confirm the whole run at once.
Where you will see it:
- In your Installs list, the Install Date column names both ends, like 8/5/2026 - 8/7/2026.
- On the request’s page, the details read Confirmed Dates with the run, and 3 days on site underneath, so you know how long to arrange access, parking, and a site contact for.
- In the confirmation we send by email and in the portal, which names the run rather than just the first morning.
Plan for our crew being on site every day of the run, not only the first. If the job turns out to need another day, or one fewer, we adjust the dates on the request, so its page always shows the run we are working to - it is the place to check before you arrange site access. A single-day install looks exactly as it always has: one Confirmed Date, and no days-on-site line.
The whole run is also what the job’s invoice covers, so its period reads from the first day to the last - see The invoice for your install.
Checking the route to your site
Section titled “Checking the route to your site”Every request with an address on it shows a Delivery Route card: a map of the drive from our Tampa warehouse to your install address, how many miles it is, and roughly how long the drive takes each way. It is the quickest way to confirm we are headed to the right place.
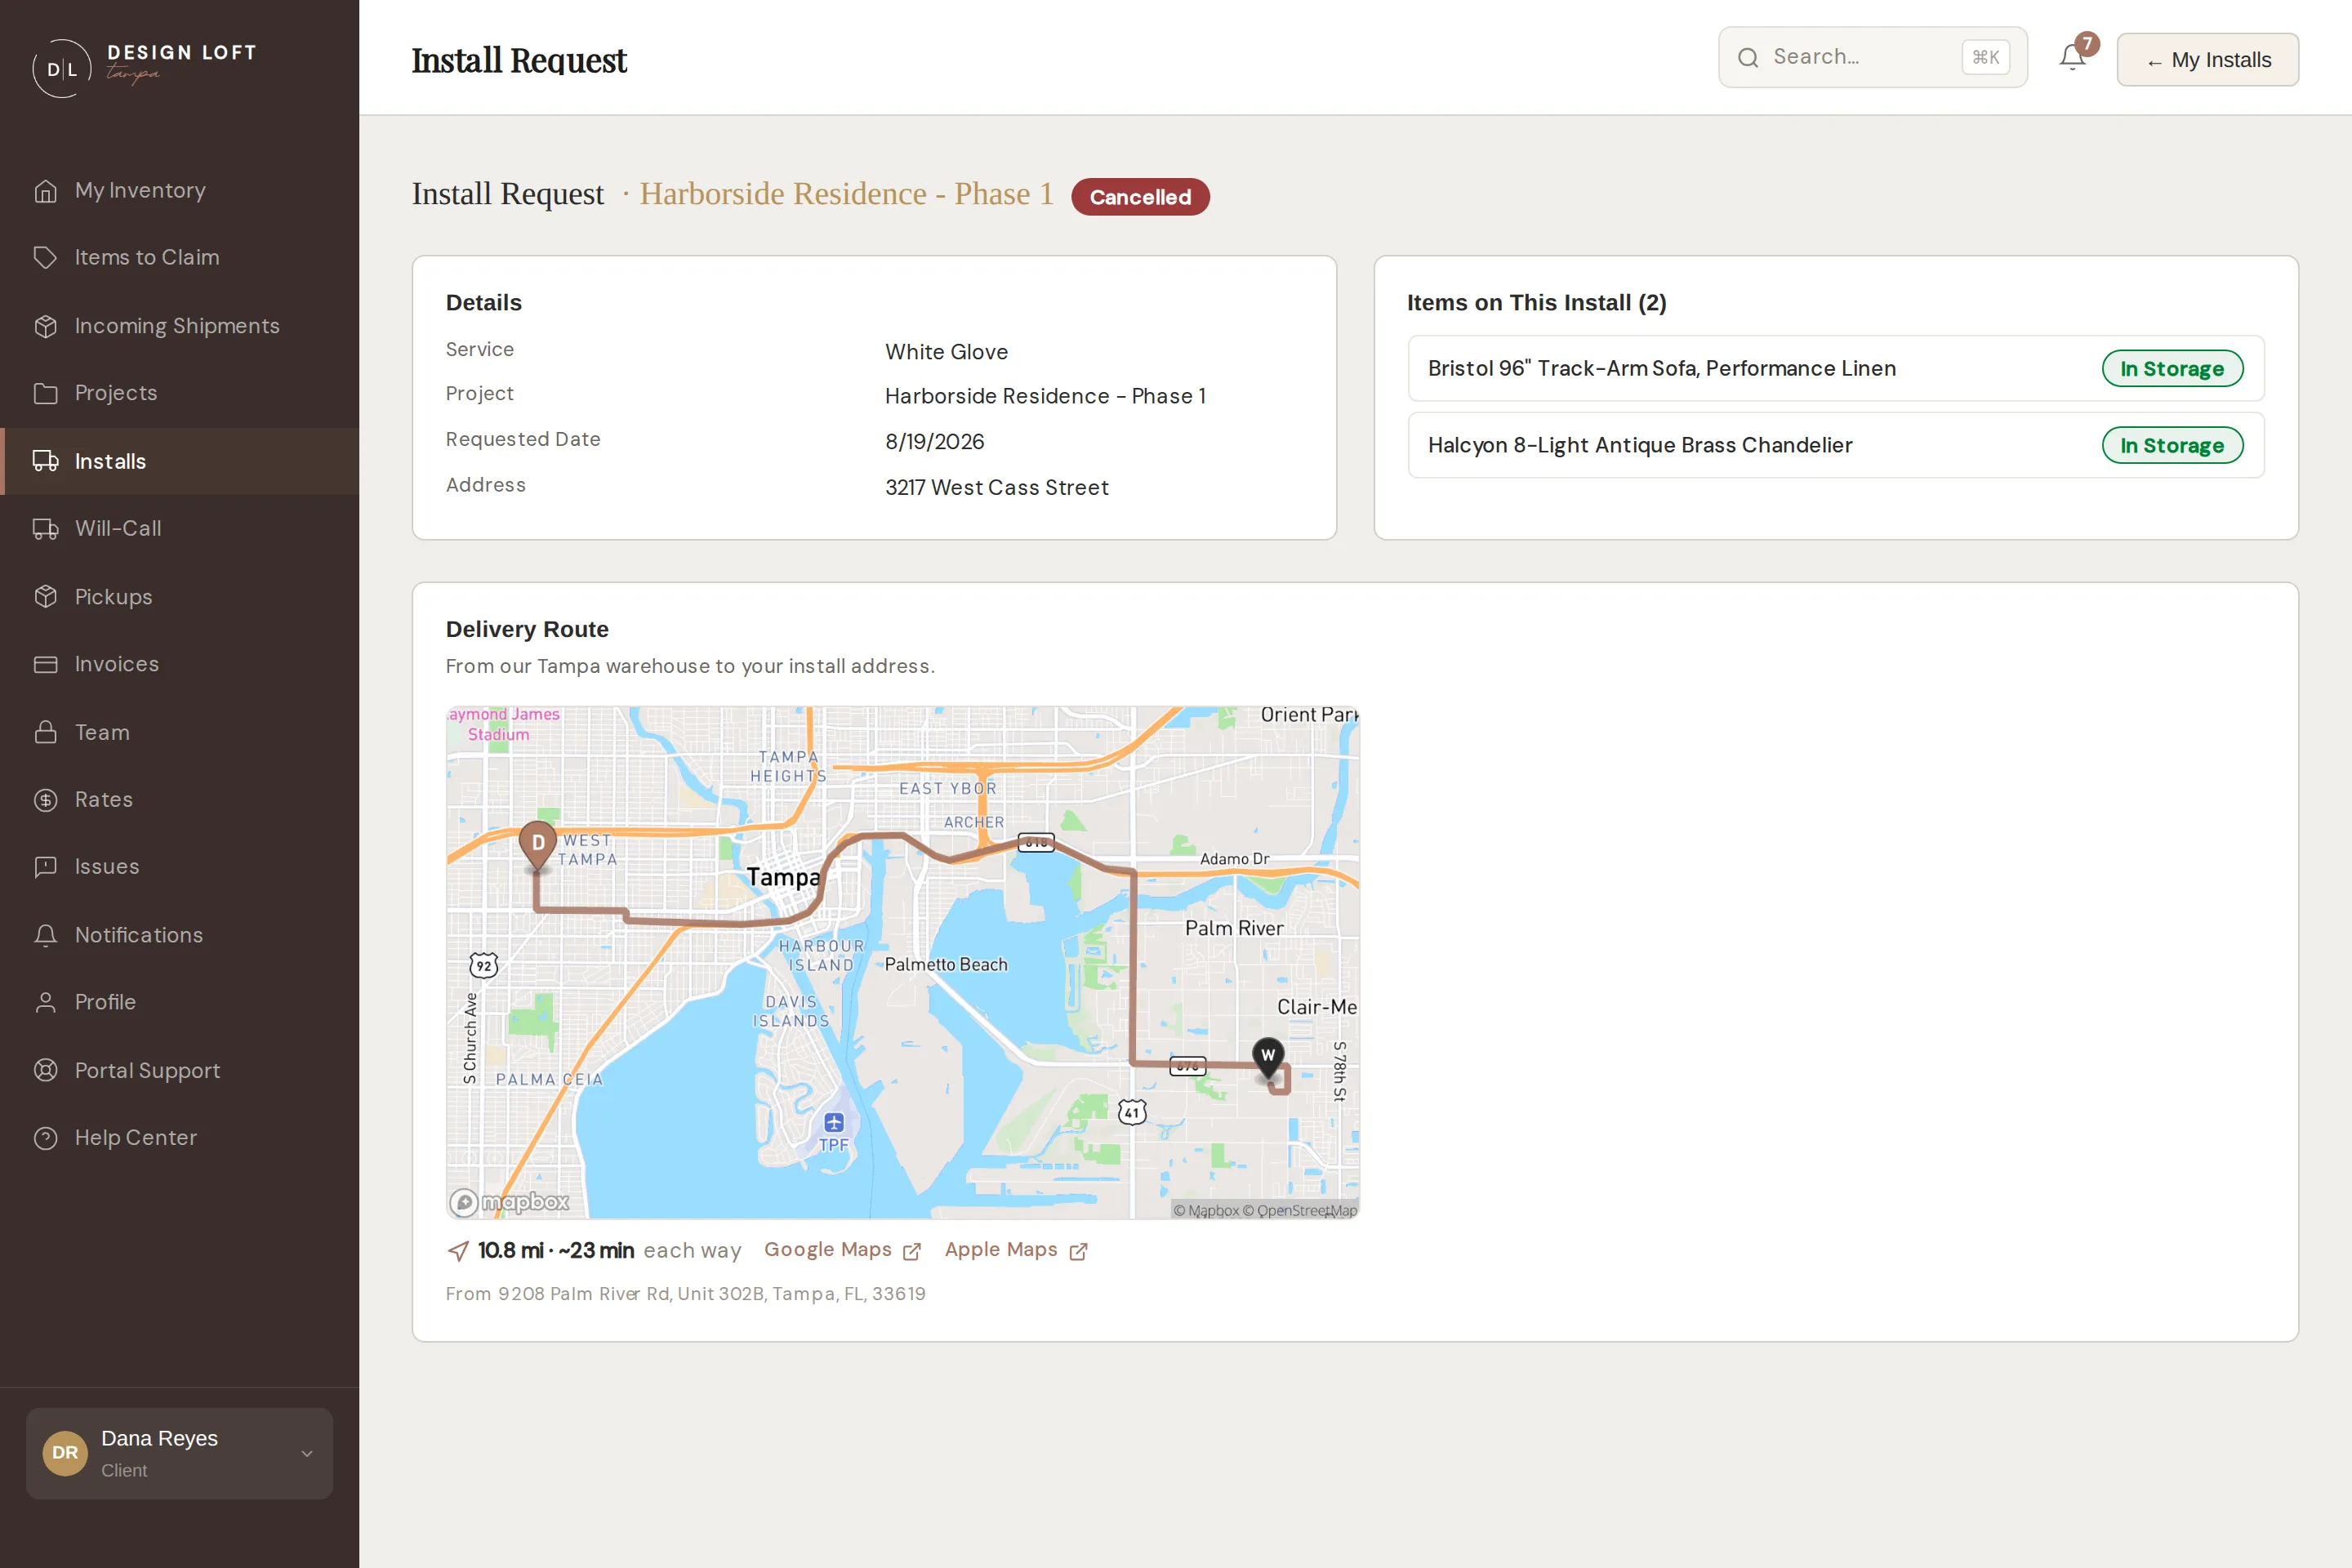
- Open Installs and click Details on the request.
- Scroll to Delivery Route.
- Check that the map lands where your site actually is.
- Need directions of your own? Click Google Maps or Apple Maps to open the same drive with turn-by-turn directions on your phone or computer.
If the map cannot place the address, that usually means the address needs a correction - contact our team and we will fix it before install day.
The distance and time are a normal driving estimate, not a promise about arrival time. Traffic, the crew’s other stops that day, and how long the install itself takes all move the clock.
If we propose a different date
Section titled “If we propose a different date”Sometimes none of the dates you asked for are open. When that happens, we propose the closest date we can do: you get a notification, the request shows Date Proposed, and its page opens with a banner asking for your answer. If there is a reason worth knowing, a short note from our team appears in the banner too.
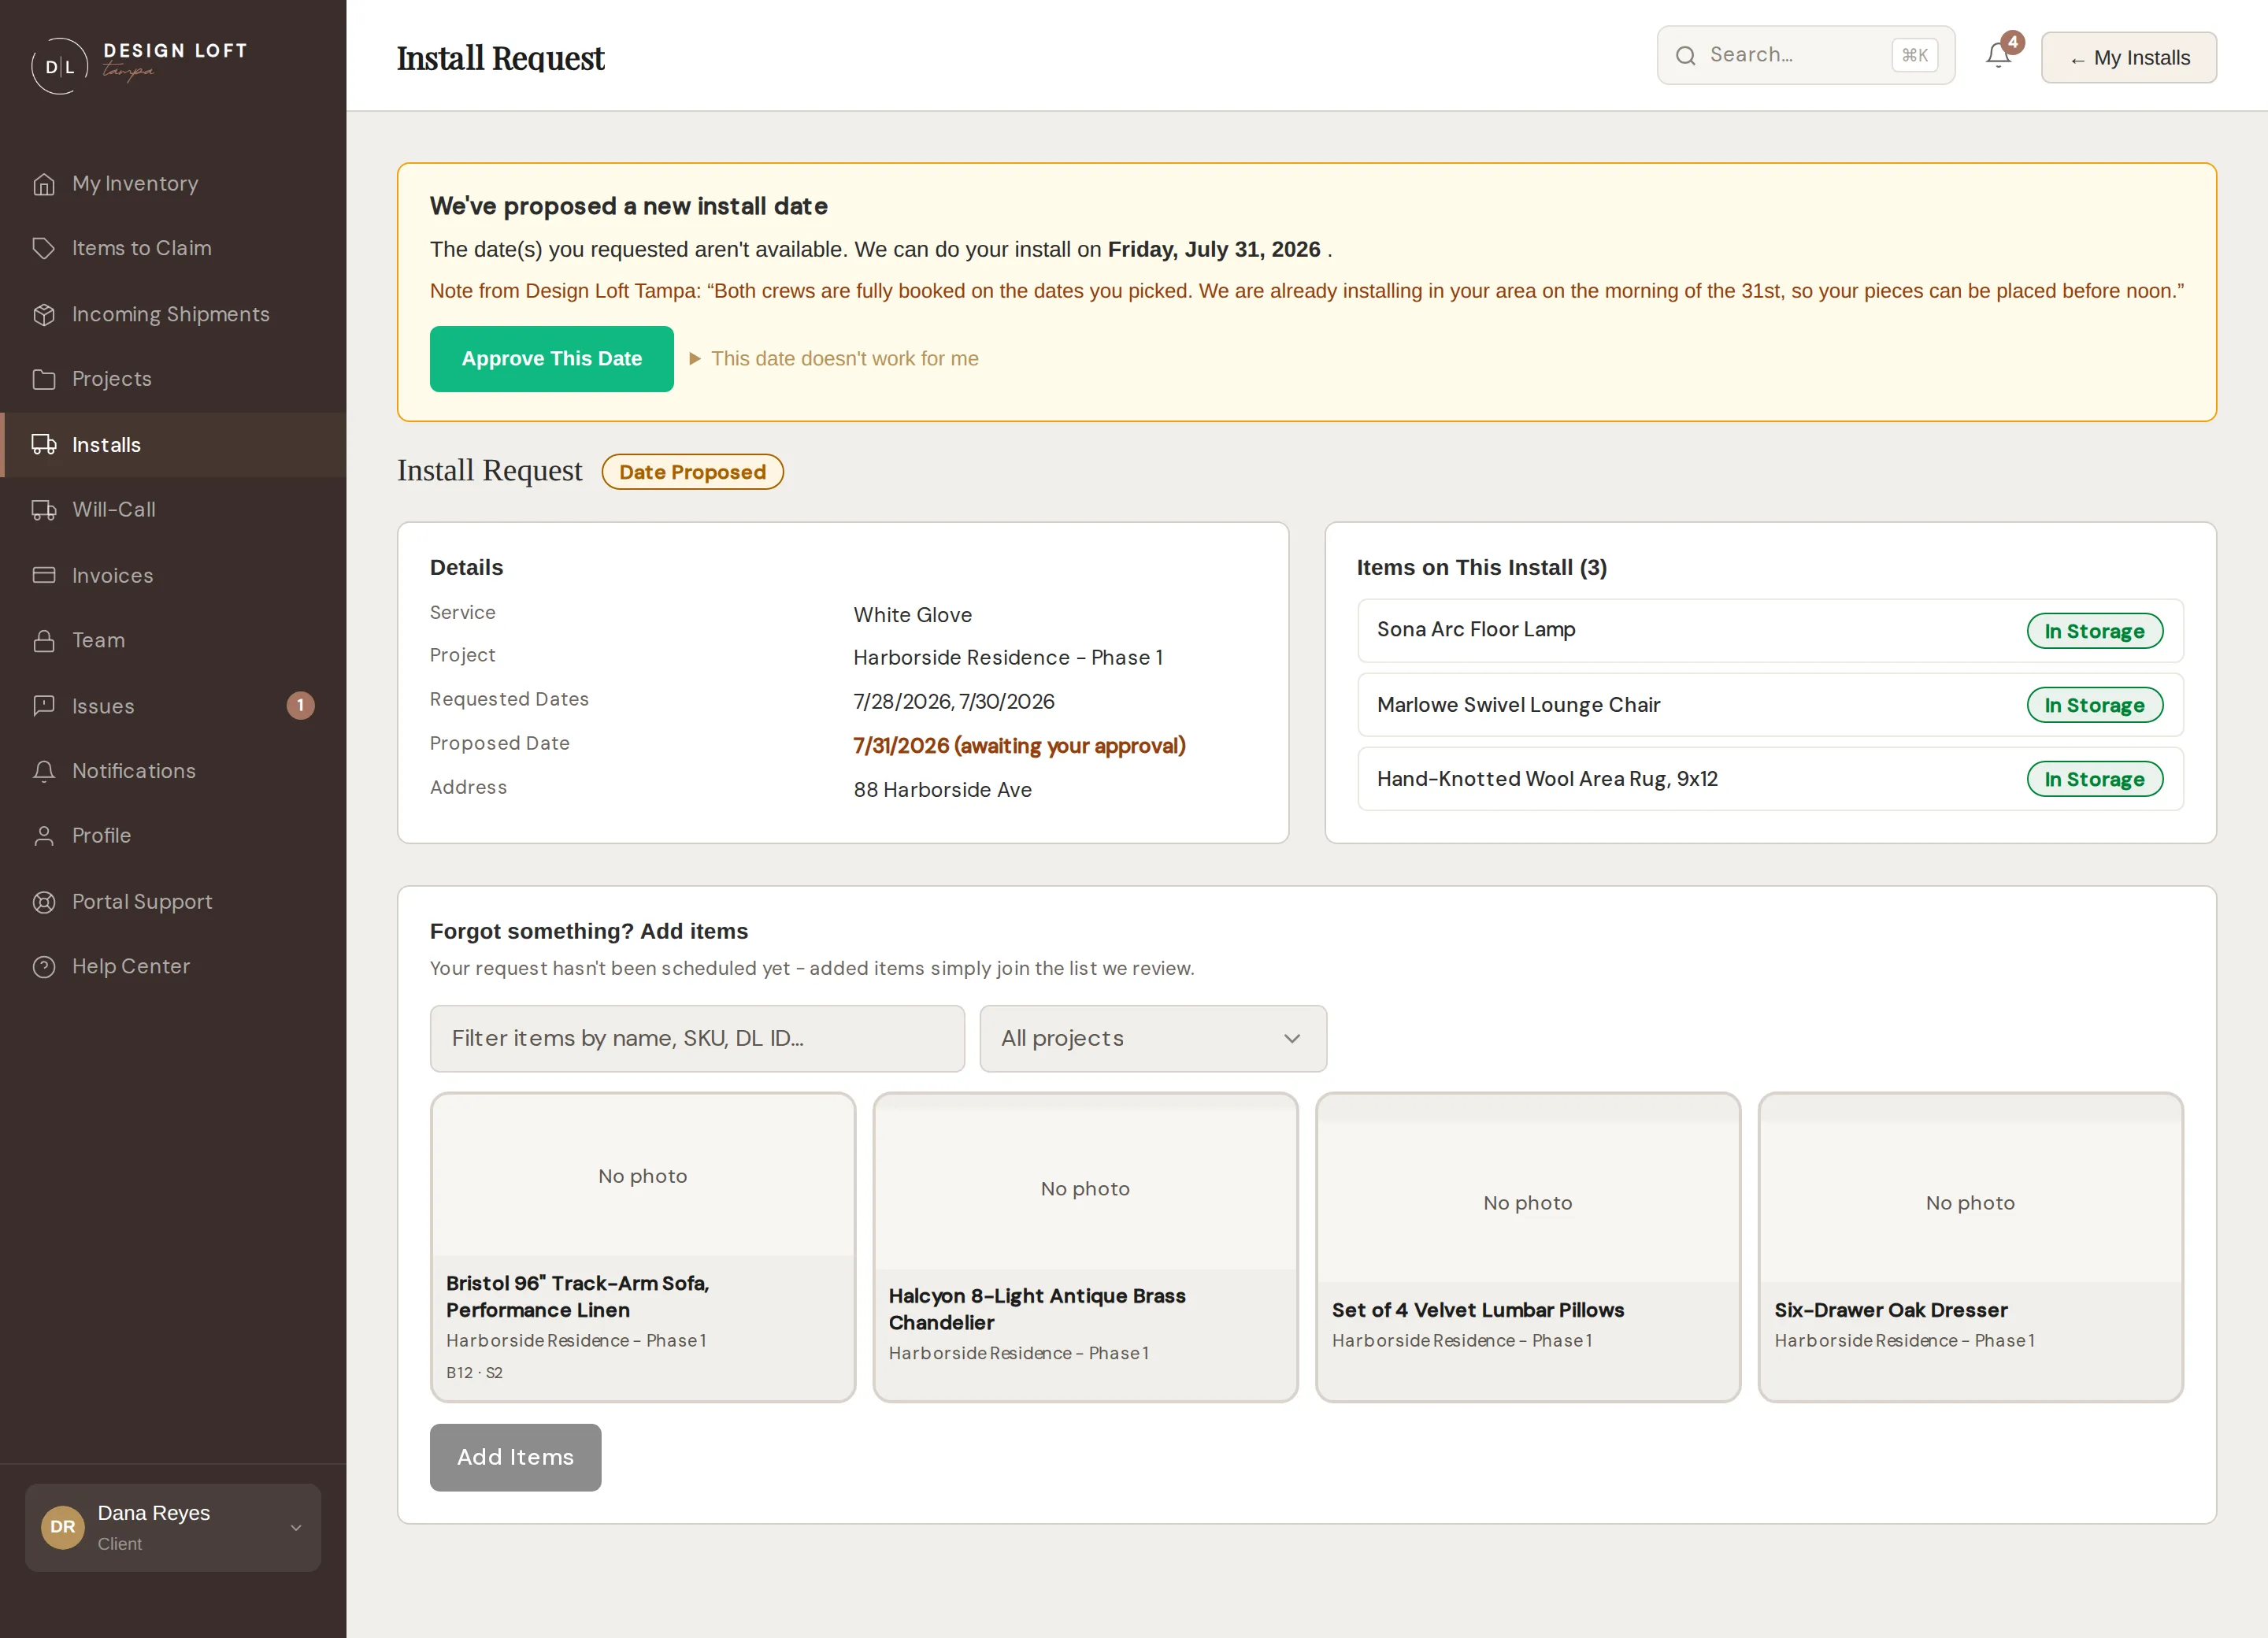
Answer right in the banner:
- The date works? Click Approve This Date. That is it - your install is confirmed for that date on the spot, and you get the usual confirmation.
- The date does not work? Click This date doesn’t work for me, tell us what would suit you better (even “any day the following week” helps), and click Send Back to Design Loft. The request goes back into our scheduling queue and we follow up with other options.
A proposed date never becomes your install date on its own - nothing is scheduled until you approve it. And you can still add items to the request while a proposal is waiting for your answer.
If the job needs more than one day, that is part of what we are proposing: the notification naming the proposed date names the whole run, so you know it is, say, the 12th and the 13th before you answer. Approving accepts those days together, and the request’s page then shows both dates and the days on site - see When an install runs more than one day.
If a day we propose lands on a Saturday or Sunday, approving it accepts the weekend callout fee along with the dates. The fee is charged once for the job however many days it runs. Send it back and ask for weekdays if you would rather not have it on the install’s invoice.
If the request was a date hold, the same thing happens with its own wording: the status reads Date Offered, and the page asks you to hold the date we offered or send it back. Answering it also moves the date by which your items have to be confirmed - see If we offer you a different date.
Forgot something? Adding items
Section titled “Forgot something? Adding items”Realized a lamp should have been on the list? Add it yourself - no need to call.
- Open Installs and click Details on the request.
- Scroll to Forgot something? Add items. It shows everything you have in storage that is not already on this install, in the same photo grid as the request form.
- Select each item you want to add. If the grid is long, type part of an item’s name, its SKU, or the ID printed on its label into the search box to narrow it down, or pick a project to see just that job’s items. Your picks stay selected while you search and change pages, so you can gather from several searches before adding.
- Click Add Items below the grid. The button shows how many items you have picked.
What happens next depends on where the request stands:
- Not scheduled yet. The items join your request right away - we review the full list when we schedule it.
- Already scheduled. The button reads Request to Add Items. Because our crew is already planning that day, additions get a quick review from our team first. Until we confirm them, they appear on the request page under Awaiting approval, and we will notify you either way - when they join the install, or if we cannot add them this trip.
Once the install is underway or done, the add section no longer appears - contact our team instead.
Not ready for a piece? Taking items off
Section titled “Not ready for a piece? Taking items off”Decided a piece should stay in storage a while longer? We can take it off a scheduled install, right up until the truck leaves.
- Message our team and tell us which pieces to leave behind.
- We take them off the install, and you get a notification - Items taken off your install - naming each piece.
- Open the request from Installs to see the updated list.
The pieces go straight back to In Storage, free for a later install or a will-call pickup, and there is nothing extra to pay for taking them off. Your install estimate updates to match the smaller job.
We cannot take off the last piece on an install, since an install with nothing on it is a cancellation - ask us to cancel it instead. Once a piece is on the truck, it is too late to take it off this trip.
The lifecycle of a request
Section titled “The lifecycle of a request”A request that started as a date hold has its own early steps - Hold Requested, then Date Hold, until you confirm the items - and joins the normal lifecycle from there. If we cannot hold the date you asked for, it shows Date Offered in between while it waits for your answer to the date we can do.
- Submitted. Your request lands in our scheduling queue and shows as pending.
- Date proposed (sometimes). If none of your dates are open, we suggest another one and the request shows Date Proposed until you approve it or send it back - see above.
- Scheduled. We confirm a date (one of your proposed dates whenever possible) and the items move to Scheduled for Install in your inventory. A job that needs several days is confirmed as a run of dates - see When an install runs more than one day.
- Install day. Items go Pulled / Ready, then Out for Install when the truck rolls. Your day-of contact gets updates if you opted into texts. On a multi-day job that is every day of the run until the last piece is placed. If the truck makes the trip but the install cannot happen, the request shows Missed Delivery instead and your items return to storage - see If a delivery is missed.
- Done. Items are placed at the site and marked Installed, which takes them out of your everyday inventory list - search for one by name any time to open its page, as in Pieces that have left our care. The install is then invoiced on its own, a few days later - see The invoice for your install.
You will get notifications at each meaningful step - tune where those arrive in your notification preferences.
If a delivery is missed
Section titled “If a delivery is missed”Sometimes the truck arrives and the install cannot happen - the site is not ready, or nobody is there to let the crew in. When that happens, the crew brings everything back and your items are returned safely to storage, exactly where they were before the trip.
The request then shows Missed Delivery, and its page explains what happened - including a short note from our team when there is a reason worth knowing. You will get a notification too.
Two things to know from there:
- The trip is billed. The delivery team charges for the trip by the hour - the drive out, the drive back, and returning your items to their shelves - and it is billed the same way an install is, on its own invoice separate from your monthly statement. Because the pieces came back to the warehouse, that invoice covers only the trip: the items stay on storage as usual and keep billing monthly. It appears on the request’s page the same way an install’s invoice does - see The invoice for your install. If you arranged the delivery company yourself and they invoice you for the trip, our invoice carries no crew time for it either - only the work we did staging your pieces - see If your install company bills you directly.
- A missed request stays closed. When the site is ready, place a new install request for the same items - the missed request’s page has a Book a New Install with These Items button that starts a fresh request with those items already selected, so it takes a minute at most. Pick your new dates and you are back in the queue.
The best way to avoid a missed trip is to make sure someone is on site and the space is ready for the whole confirmed run - and if plans change before install day, contact our team early so we can move the date instead of making the trip.
The invoice for your install
Section titled “The invoice for your install”An install is billed on its own invoice covering just that job, rather than waiting to appear on your next monthly statement. Once we have issued it, it shows up on the request’s own page:
- Open Installs and click Details on the finished install.
- Look for the Invoice for this install card near the top of the page. It shows the amount.
- View invoice opens the full invoice, with every line and the total.
- PDF downloads a copy on our letterhead, ready for your records or your client’s file.
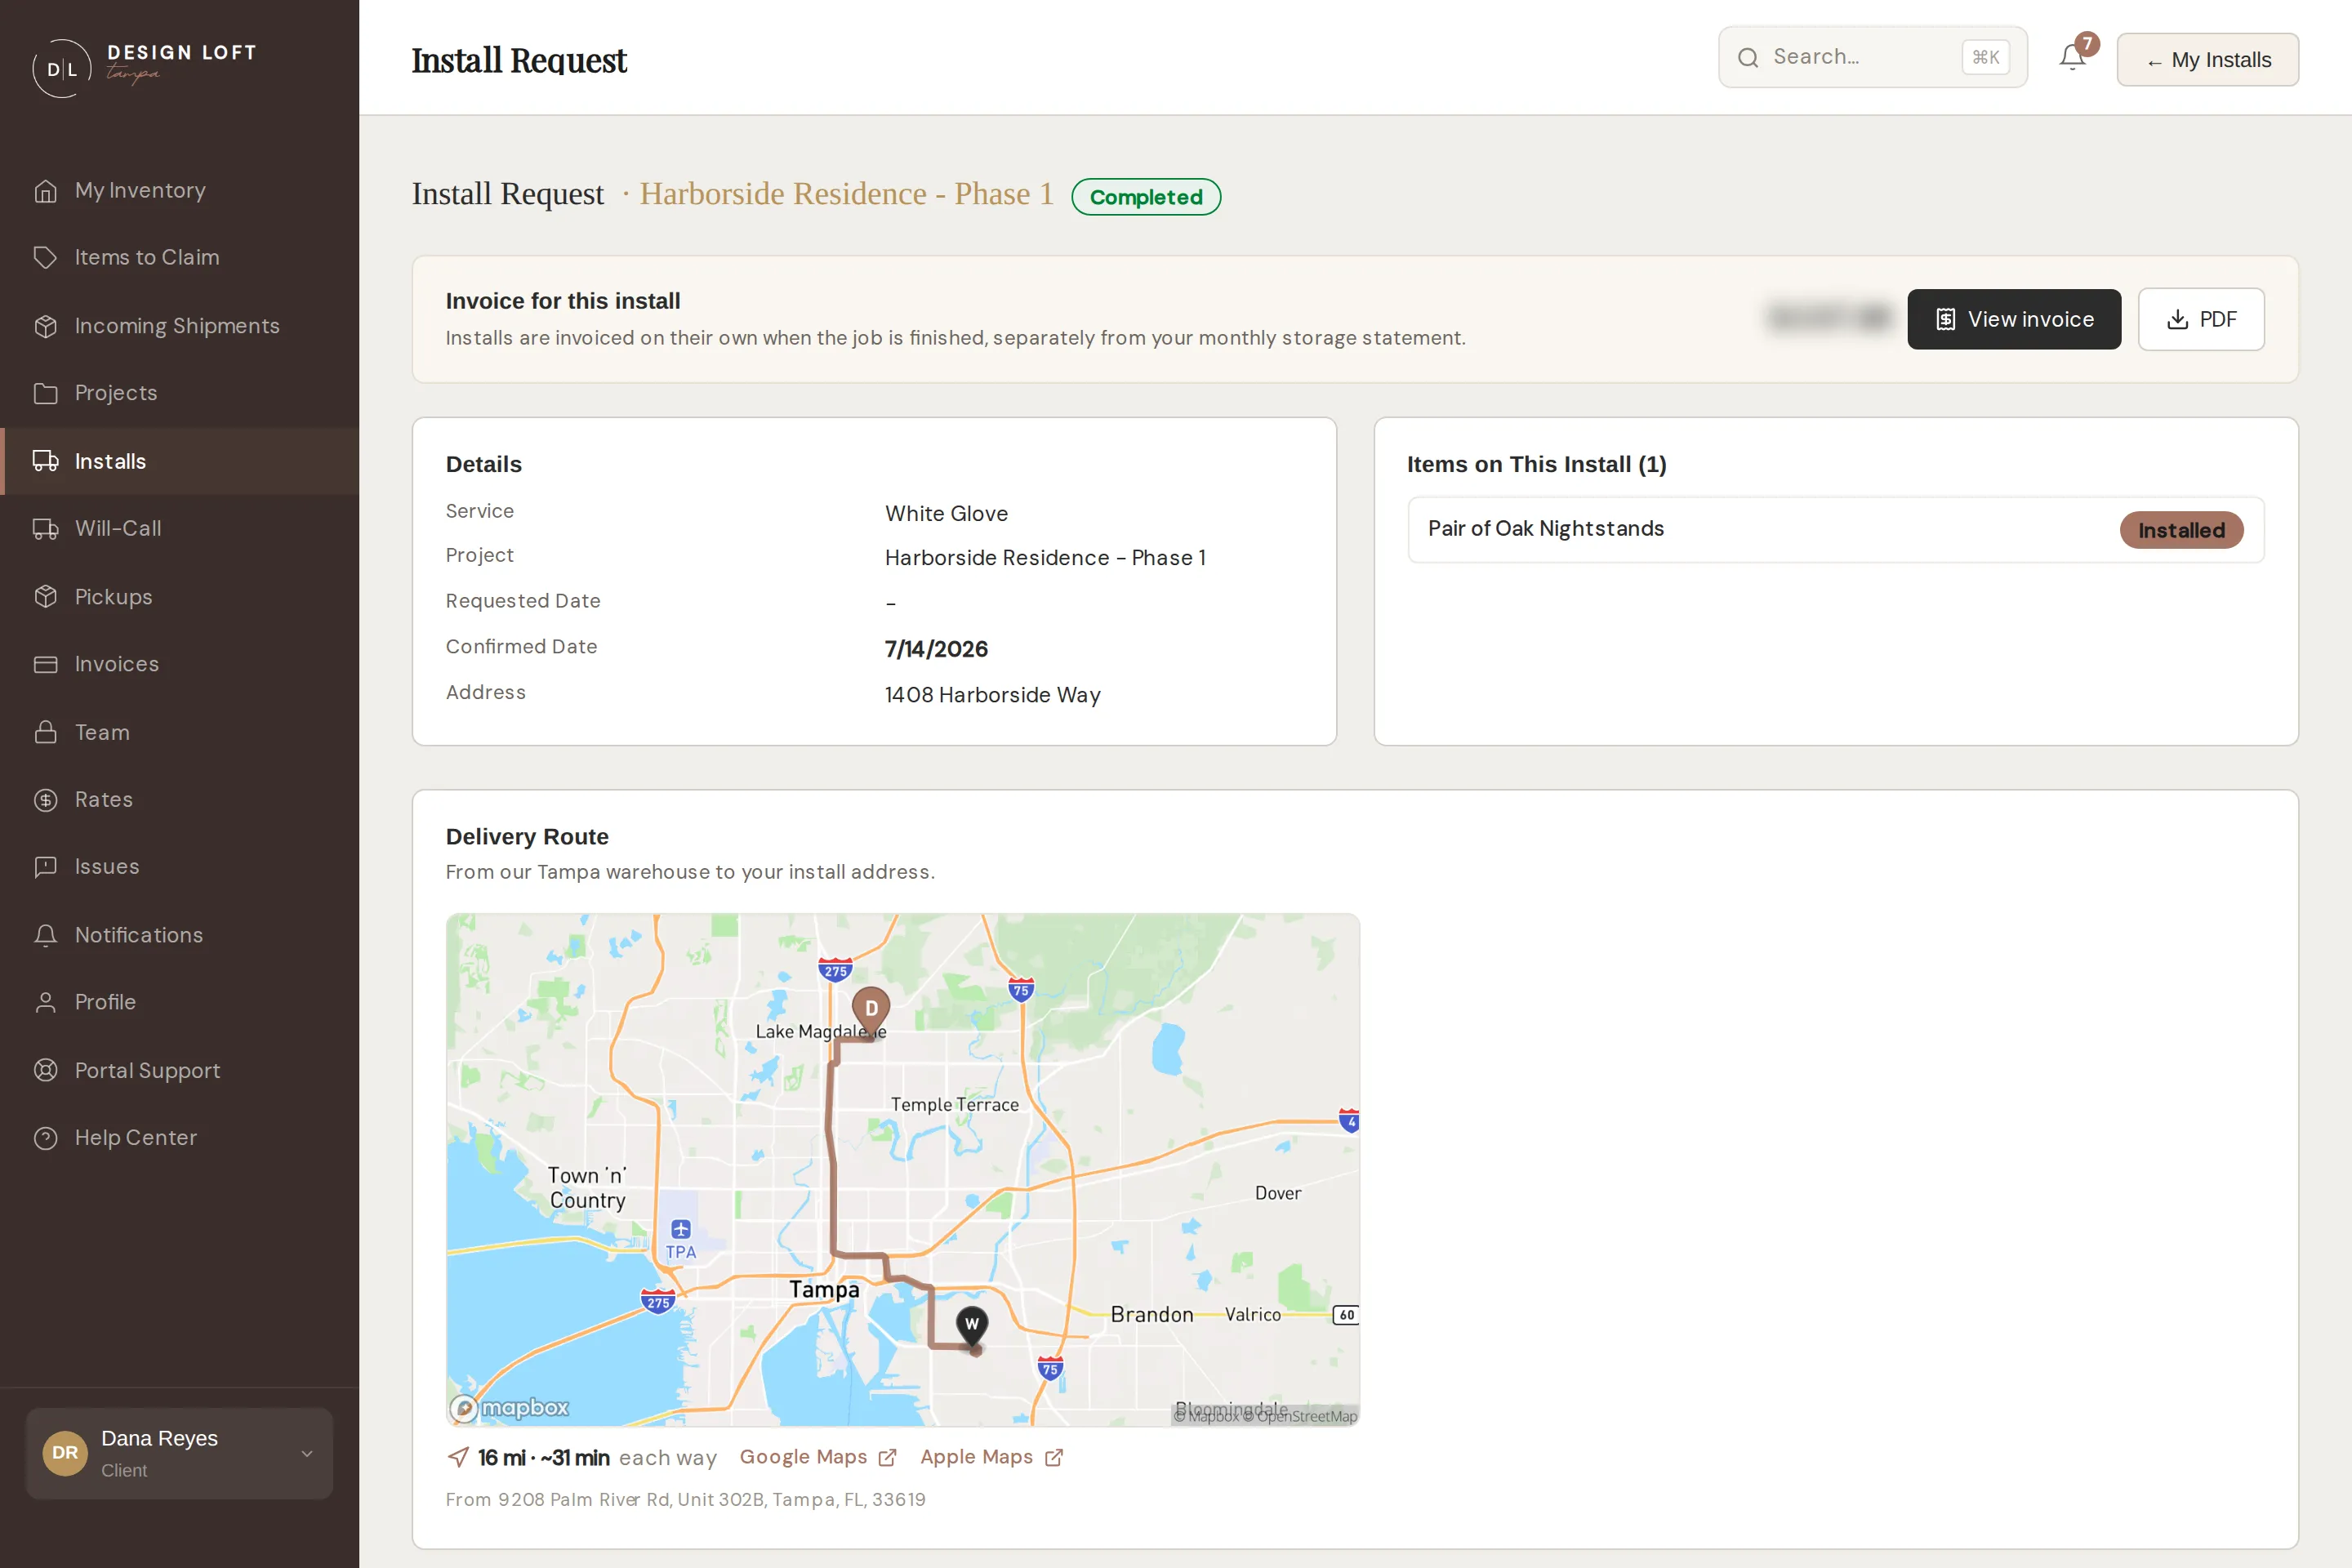
The card appears once the invoice is issued, which is usually a few days after the job finishes: the install is billed for the crew and the hours it actually took, so it is priced once those hours are confirmed. If your own install company is billing you for the crew, there is no crew bill for us to wait on, so the invoice can go out as soon as the job is closed out - and when it does, the card’s note says the amount covers our work only, with no install labor on it. See If your install company bills you directly. Until then the request page simply has no card, and nothing is owed. What we estimated beforehand stays on the page as a single line - Estimated before the install - so you can hold the two numbers up against each other, and Your install estimate explains why they can differ. A job that ran across several days is invoiced once for the whole run, and the invoice period reads from the first day on site to the last. The invoice also settles the pieces that were installed: their storage for the month they left, and their receiving if it had not been invoiced yet, so nothing about them trails onto your next monthly statement. What is on an invoice explains the lines you will see, and every invoice also sits in your Invoices list.
Changing or canceling a request
Section titled “Changing or canceling a request”Adding items you can do yourself, right on the request page (see above). To shift dates or cancel, contact our team as early as you can and we will adjust the schedule.